Azure Container Apps Workshop
Welcome to the Azure Container Apps workshop. In this micro OpenHack, you’ll go through tasks that will help you master the basics and more advanced topics required to deploy applications to Azure Container Apps. This exercice can be done alone or in group and will take between 2 and 4 hours depending on your pace. If you find any issue or have any remark, don’t hesitate to open an issue on the dedicated repository
This workshop is NOT an official resource from the product group. They are currently working on dedicated and up-to-date content. This workshop may not be up to date with the very last features of Azure Container Apps but we work hard to do so. Don’t hesitate to read the official documentation to know more about Azure Container Apps.
Discover
Azure Container Appsis a new serverless container platform for applications that need to scale on demand in response to HTTPS requests, events, or simply run as always-on services or background job processing without managing VMs, orchestrators, or other cloud infrastructure. Azure Container Apps makes it easy to manage your containerized applications with built-in autoscaling, traffic routing, application lifecycle management, and service-to-service communication in a fully managed environment.
While App Service, Functions, and Logic Apps provide application developers with fully-managed, high-productivity solutions for domain-specific problems, customers have to drop out of the fully-managed world and fall back to Kubernetes for full microservice applications or to run general purpose container applications. Azure container Apps fills this gap and rounds out the Azure application platform by providing high-level APIs for the most common container application scenarios, including auto-scaling, version management, application upgrades, and service-to-service communication in a fully managed environment.
Common uses for Azure Container Apps include:
- Deploying API endpoints
- Hosting background processing applications
- Handling event-driven processing
- Running microservices
Applications built on Azure Container Apps can dynamically scale based on the following characteristics:
- HTTP traffic
- Event-driven processing
- CPU or memory load
- Any KEDA-supported scaler
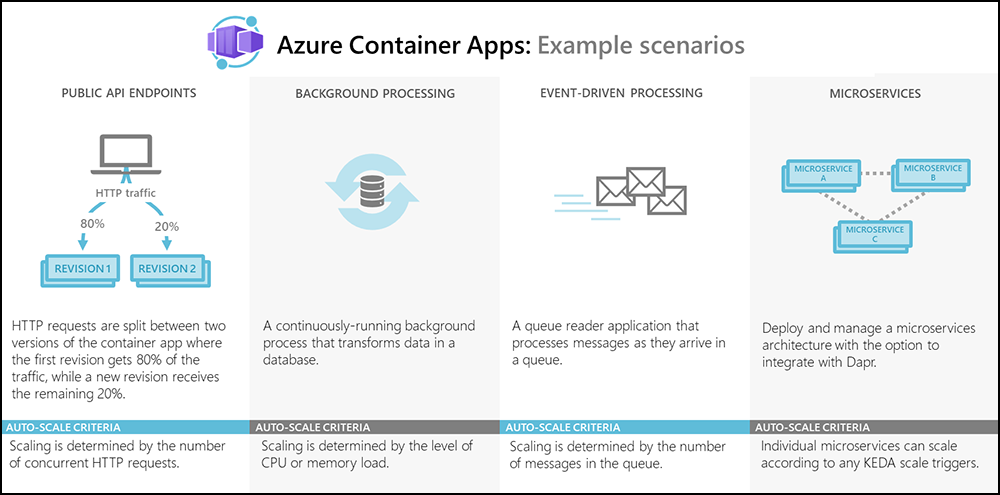
Azure Container Apps enables executing application code packaged in any container and is unopinionated about runtime or programming model. With Container Apps, you enjoy the benefits of running containers while leaving behind the concerns of managing cloud infrastructure and complex container orchestrators.
With Azure Container Apps, you can:
-
Run multiple container revisions and manage the container app’s application lifecycle.
-
Autoscale your apps based on any KEDA-supported scale trigger. Most applications can scale to zero1.
-
Enable HTTPS ingress without having to manage other Azure infrastructure.
-
Split traffic across multiple versions of an application for Blue/Green deployments and A/B testing scenarios.
-
Use internal ingress and service discovery for secure internal-only endpoints with built-in DNS-based service discovery.
-
Build microservices with Dapr and access its rich set of APIs.
-
Run containers from any registry, public or private, including Docker Hub and Azure Container Registry (ACR).
-
Use the Azure CLI extension or ARM templates to manage your applications.
-
Securely manage secrets directly in your application.
-
View application logs using Azure Log Analytics.
1 Applications that scale on CPU or memory load can’t scale to zero.
Prerequisites
Prerequisites
To realize the workshop, you will require several components. If you don’t have them yet, you’ll be guided to acquire them.
- a GitHub Account
- VS Code or equivalent
- an Azure subscription (and at least a dedicated resource group).
- if you plan to run command from your computer: installing Azure CLI and Bicep
Some limits/quotas are present for the moment. If you plan to play this workshop with a large group of individuals, you may require to create several subscriptions.
Azure subscription
Log in to one of your Azure subscriptions.
Please use your username and password to login to https://portal.azure.com.
Also, please authenticate your Azure CLI by running the command below on your machine and following the instructions.
az login
az account show
If you don’t have the Azure CLI installed, read below how to install it or how to use Azure Cloud Shell
Tools
During this workshop you are going to use command line, but most of the actions may be doable using Azure Portal. In fact, during the different labs, you are going to use deliberately a mix of CLI and the Web portal to see the different ways to interact with Azure Container Apps. In real life, you will use whatever fits you the best.
Azure Cloud Shell
You can either run command lines from your own computer (we recommend using bash) or you can use the Azure Cloud Shell accessible at https://shell.azure.com once you log in with an Azure subscription.
Head over to https://shell.azure.com and sign in with your Azure Subscription details.
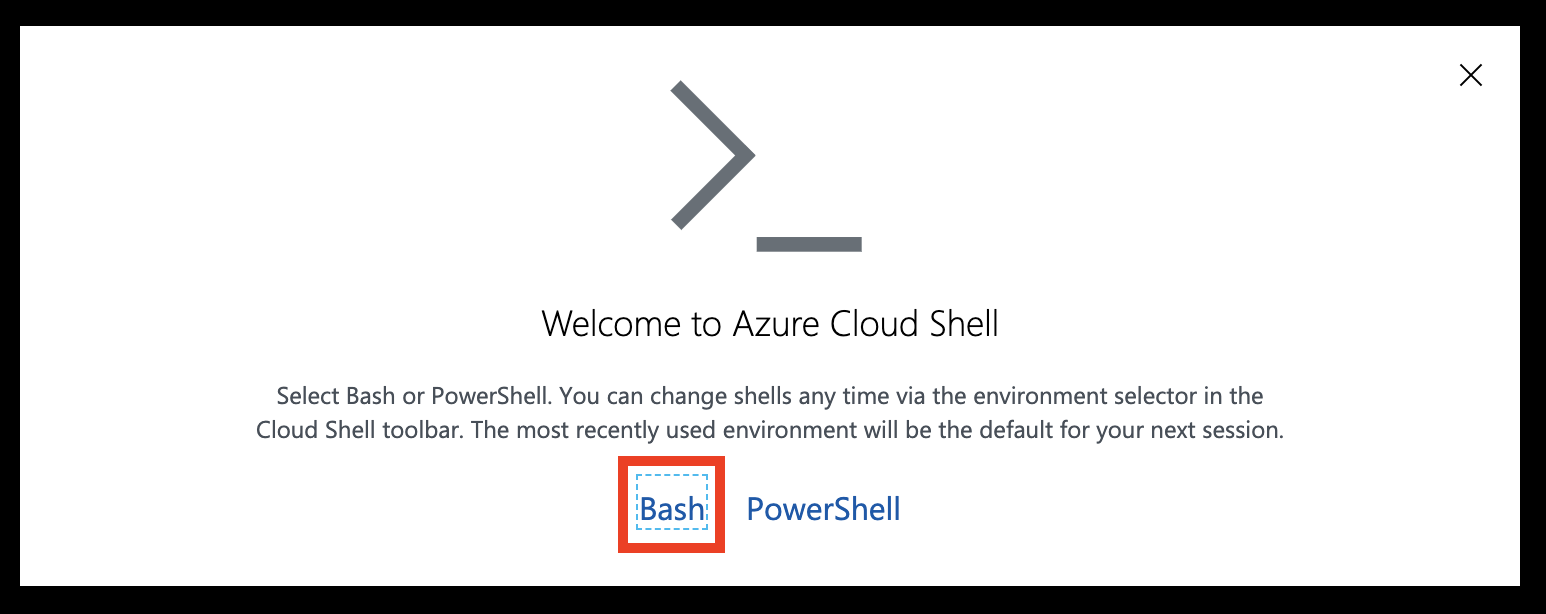
Select Bash as your shell.
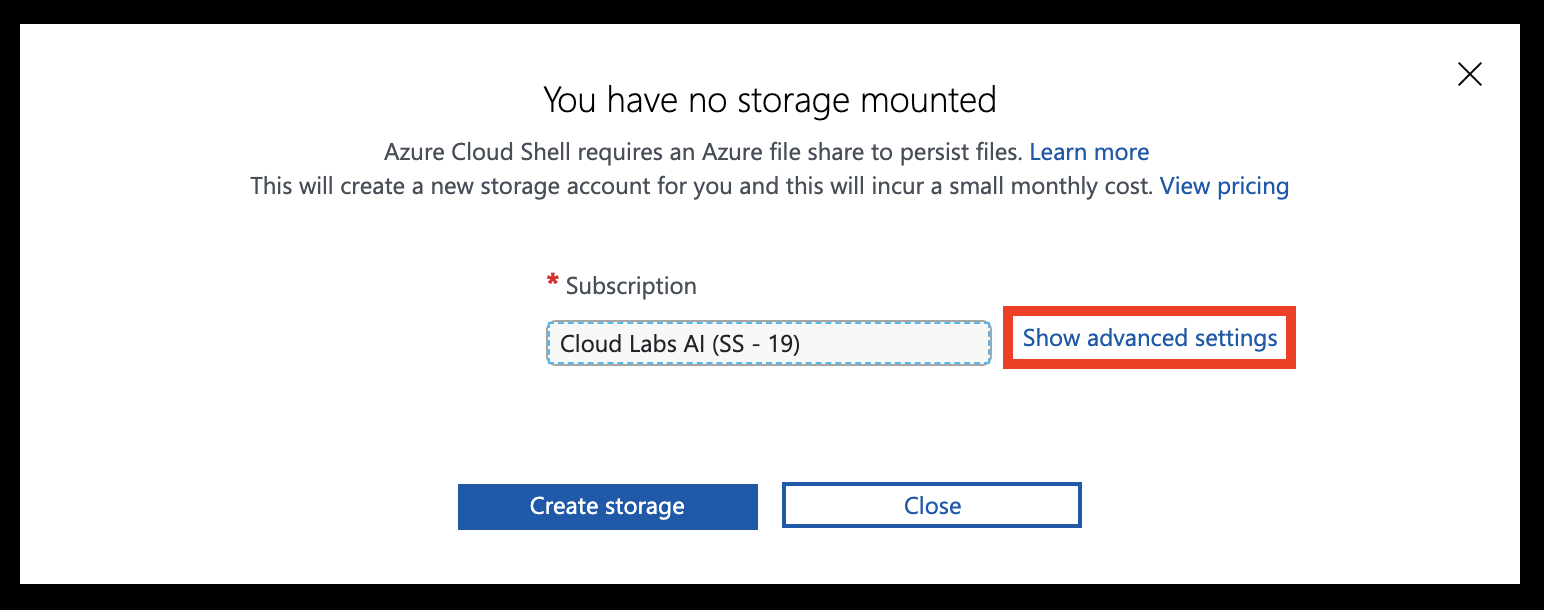
Select Show advanced settings
Set the Storage account and File share names to your resource group name (all lowercase, without any special characters). Leave other settings unchanged, then hit Create storage
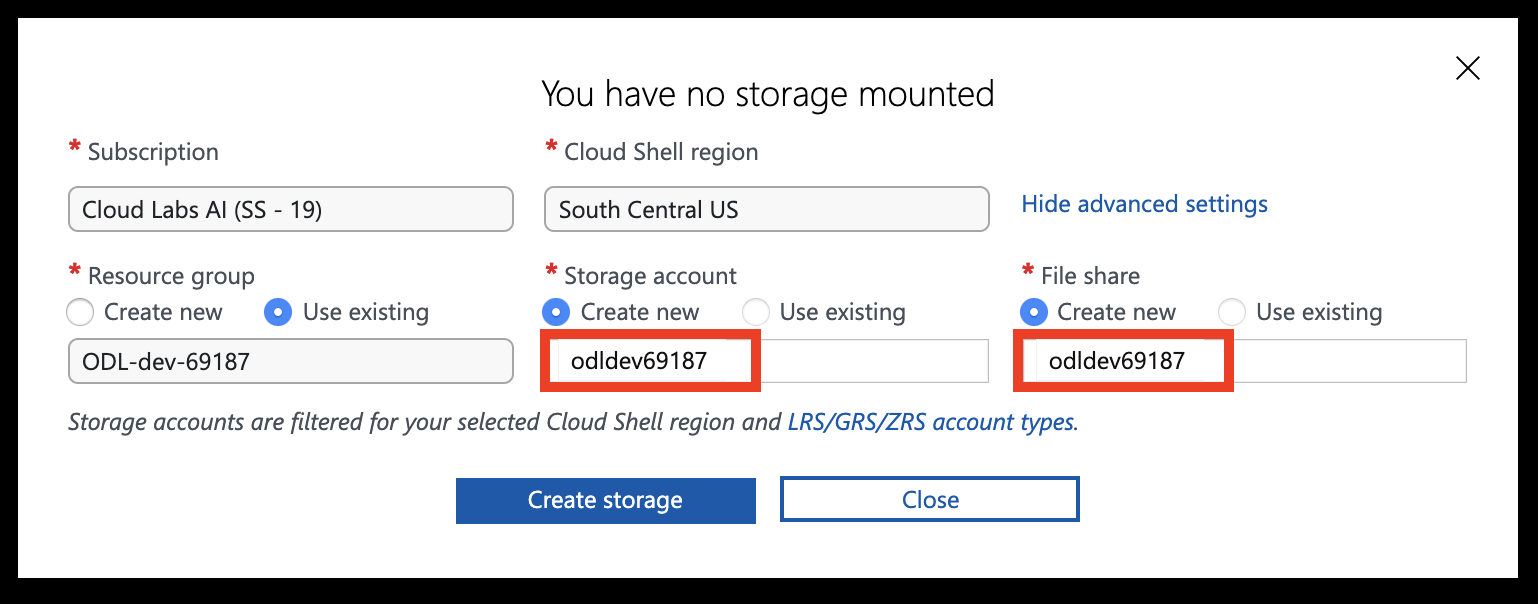
You should now have access to the Azure Cloud Shell
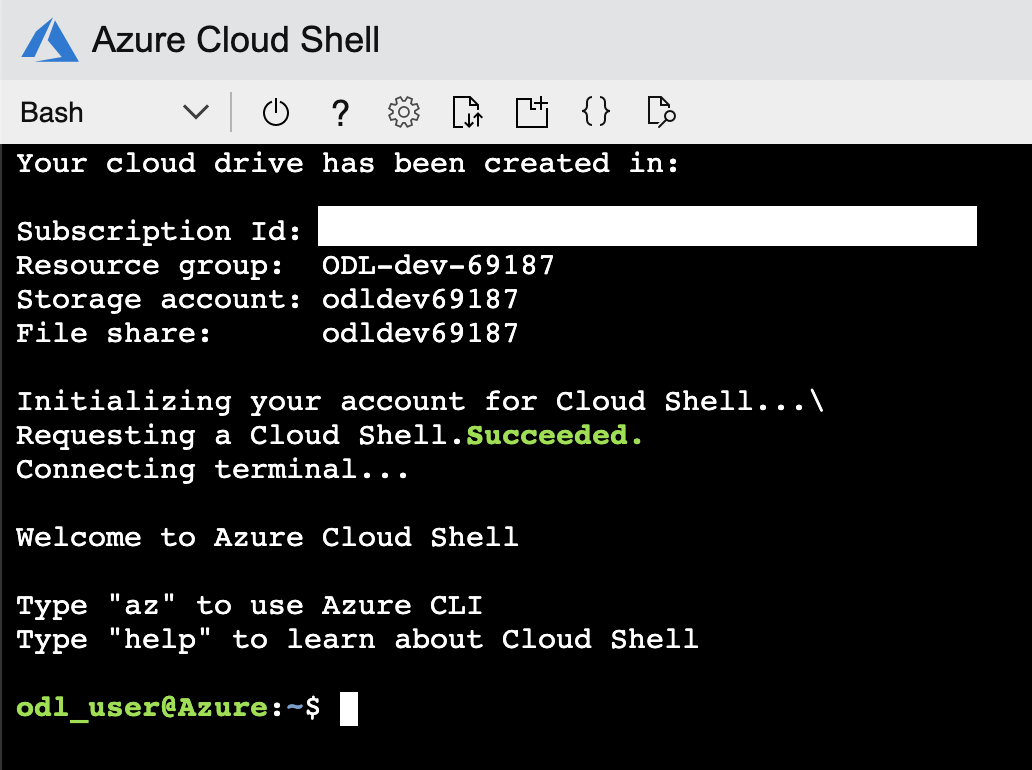
Azure CLI
Install the Azure CLI. (version 2.69 or superior)
Setup
Begin by signing in to Azure from the CLI. Run the following command, and follow the prompts to complete the authentication process.
az login
Next, install the Azure Container Apps extension to the CLI.
az extension add --name containerapp --upgrade
Once the extension is installed, register the Microsoft.App namespace.
az provider register --namespace Microsoft.App
You can use the following command to check that the provider is properly registered. It can take few minutes for it to be marked as “registrered”
az provider show -n Microsoft.App --query registrationState
Register the Microsoft.OperationalInsights provider for the Azure Monitor Log Analytics Workspace if you have not used it before.
az provider register --namespace Microsoft.OperationalInsights
And to follow the provider registration just run:
az provider show -n Microsoft.OperationalInsights --query registrationState
GitHub
Some steps of this workshop require using a GitHub account. If you don’t have one already, you can create one for free here: https://github.com/join.
Lab 1 - Hello World
Context
This first lab will guide you to deploy your first Hello World app on Containers apps, an application accessible from the Internet.
Create an environment
Create an environment
Before deploying your containerized application, you need a “place” to host your application. In Azure Container Apps, the underlying infrastructure is called an environment. An environment creates a secure boundary around a group of container apps. Container Apps deployed in the same environment are deployed in the same virtual network and write logs to the same Log Analytics workspace.
Azure Log Analytics is used to monitor your container app and is required when creating an Azure Container Apps environment.
Let’s start by setting some variables:
RESOURCE_GROUP="-<UNIQUE-NAME>rg-my-container-apps"
LOCATION="northeurope"
LOG_ANALYTICS_WORKSPACE="my-container-apps-logs"
CONTAINERAPPS_ENVIRONMENT="<UNIQUE-NAME>my-environment"
- RESOURCE_GROUP: the Azure resource group which will contain your container apps environment
- LOCATION: the Azure region in which will be deployed your apps. Be careful, Azure Container Apps is not supported in all regions yet.
- LOG_ANALYTICS_WORKSPACE: the name of the Log Analytics workspace
- CONTAINERAPPS_ENVIRONMENT: the name of the container apps environment.
With these variables defined, you can create a resource group to organize the services related to your new container app.
az group create --name $RESOURCE_GROUP --location "$LOCATION"
Create a new Log Analytics workspace with the following command:
az monitor log-analytics workspace create --resource-group $RESOURCE_GROUP --workspace-name $LOG_ANALYTICS_WORKSPACE
Next, retrieve the Log Analytics Client ID and Client Secret and put them in the variables:
- LOG_ANALYTICS_WORKSPACE_CLIENT_ID
- LOG_ANALYTICS_WORKSPACE_CLIENT_SECRET
Bash
Make sure to run each query separately to give enough time for the request to complete.
LOG_ANALYTICS_WORKSPACE_CLIENT_ID=`az monitor log-analytics workspace show --query customerId -g $RESOURCE_GROUP -n $LOG_ANALYTICS_WORKSPACE --out tsv`
LOG_ANALYTICS_WORKSPACE_CLIENT_SECRET=`az monitor log-analytics workspace get-shared-keys --query primarySharedKey -g $RESOURCE_GROUP -n $LOG_ANALYTICS_WORKSPACE --out tsv`
PowerShell
Make sure to run each query separately to give enough time for the request to complete.
$LOG_ANALYTICS_WORKSPACE_CLIENT_ID=(az monitor log-analytics workspace show --query customerId -g $RESOURCE_GROUP -n $LOG_ANALYTICS_WORKSPACE --out tsv)
$LOG_ANALYTICS_WORKSPACE_CLIENT_SECRET=(az monitor log-analytics workspace get-shared-keys --query primarySharedKey -g $RESOURCE_GROUP -n $LOG_ANALYTICS_WORKSPACE --out tsv)
Azure Container Apps environment
Individual container apps are deployed to an Azure Container Apps environment. To create the environment, run the following command:
az containerapp env create \
--name $CONTAINERAPPS_ENVIRONMENT \
--resource-group $RESOURCE_GROUP \
--logs-workspace-id $LOG_ANALYTICS_WORKSPACE_CLIENT_ID \
--logs-workspace-key $LOG_ANALYTICS_WORKSPACE_CLIENT_SECRET \
--location "$LOCATION"
You may receive an error message telling that features are not allowed for this subscription. It means that the service Azure Container Apps is not available for the selected region.
Once the environment is created, it is time to deploy applications.
Deploy an app
Create your first app
Let’s create and deploy your first hello-world application with the command az containerapp create which is documented here. We will use a ready-to-use container image, the mcr.microsoft.com/azuredocs/containerapps-helloworld:latest.
Use
az containerapp --helpto discover the different available parameters
Don’t forget to set the parameter --ingress to external to make the container app available to public requests (exposed to the Internet). By adding the query parameter, you can format the result returned by the create command: --query configuration.ingress.fqdn
az containerapp create \
  --name my-container-app \
  --resource-group $RESOURCE_GROUP \
  --environment $CONTAINERAPPS_ENVIRONMENT \
  --image mcr.microsoft.com/azuredocs/containerapps-helloworld:latest \
  --target-port 80 \
  --ingress 'external' \
  --query configuration.ingress.fqdn
In our case, the create command returns (only) the container app’s fully qualified domain name because we specified the query parameter.

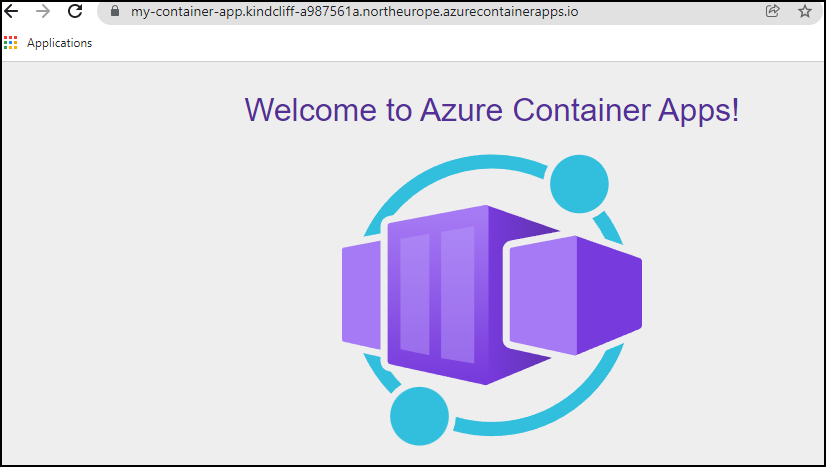
Copy this URL to a web browser to see the following message.
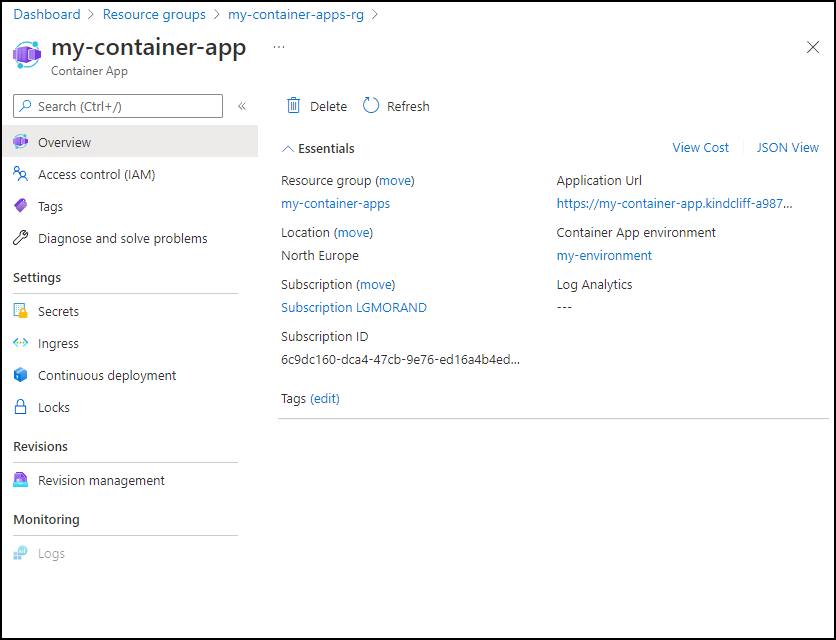
Open the Azure Portal. In your resource group, you should see your container apps environment but also your container app. Click on it. From here, you can directly see, diagnose or reconfigure your application, such as changing the ingress configuration, the secrets, the load balancing, or the continuous deployment:
That’s it! How simple is it to deploy and host an application!
Create a revision
A revision is an immutable snapshot of a container app. The first revision is automatically created when you deploy your container app. New revisions will be automatically created when a container app’s template configuration changes. Indeed, while revisions are immutable, they are affected by changes to global configuration values, which apply to all revisions.
Revisions are most useful when you enable ingress to make your container app accessible via HTTP. Revisions are often used when you want to direct traffic from one snapshot of your container app to the next. Typical traffic direction strategies include A/B testing and BlueGreen deployment.
The following diagram shows a container app with two revisions.
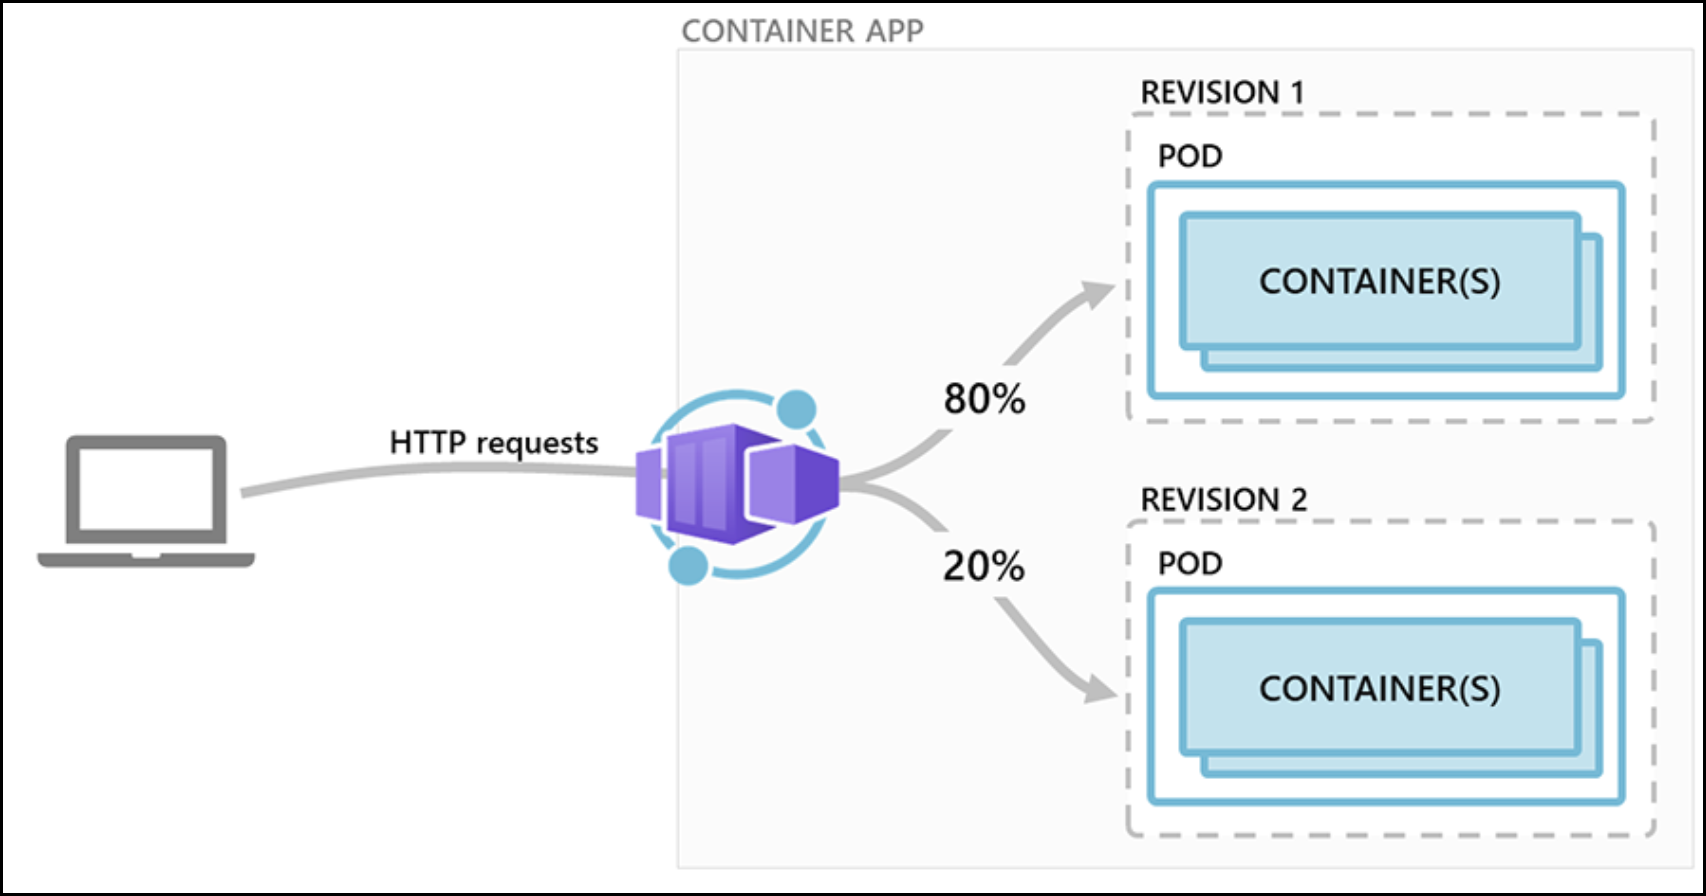
Note that changes made to a container app fall under one of two categories:
Revision-scopechanges are any change that triggers a new revision (e.g: changes to containers, add or update scaling rules, changes to Dapr settings, etc.)Application-scopechanges don’t create revisions (e.g: changes to traffic splitting rules, turning ingress on or off, changes to secret values, etc.)
Create your first revision
By default your container app is set on “single revision mode”. It means that each new revision will ecrase the current revision and take all the incoming traffic. To have several revisions running at the same time you must enable the “multi-revision mode” on your containerapp.
Go to the revision management blade on the left inside of the container apps panel. At the top of the page you’ll find the “choose revision mode” option where you’ll be able to choose the revision mode.
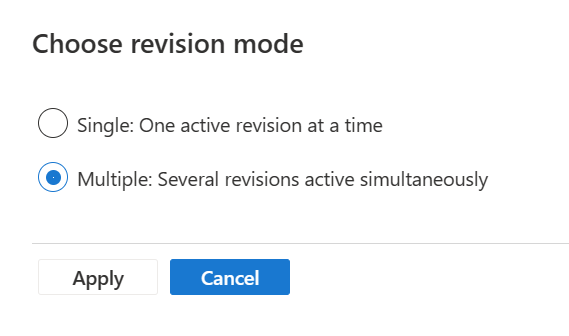
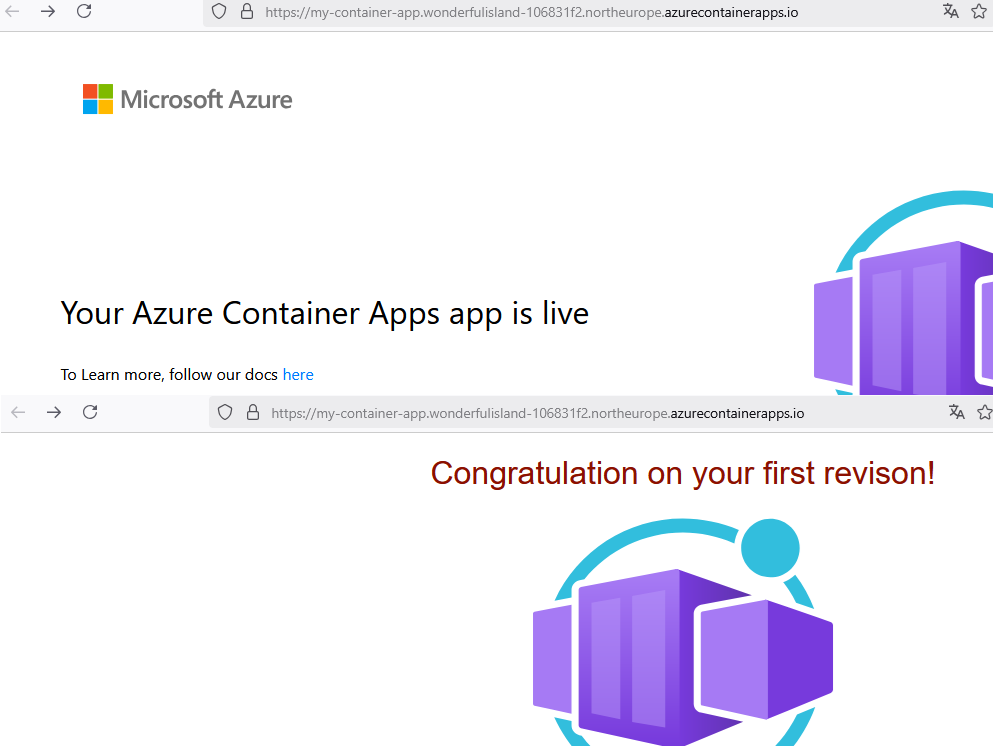
Let’s create and deploy a new version of the Hello World application with a different layout. To do so, you will have to deploy a new container within our application, meaning that we’re doing a revision-scope change. This new version of our application can be found on docker hub mavilleg/acarevision-helloworld:acarevision-hellowold. (yes, there is a typo)
Once this new revision is provisionned, we will configure an even split of the traffic between the two revisions applied by assigning percentage values. You can decide how to balance traffic among different revisions. Traffic splitting rules are assigned by setting weights to different revisions.
Go to the revisions management blade on the left inside of the container apps panel.
Click on Create a new revision
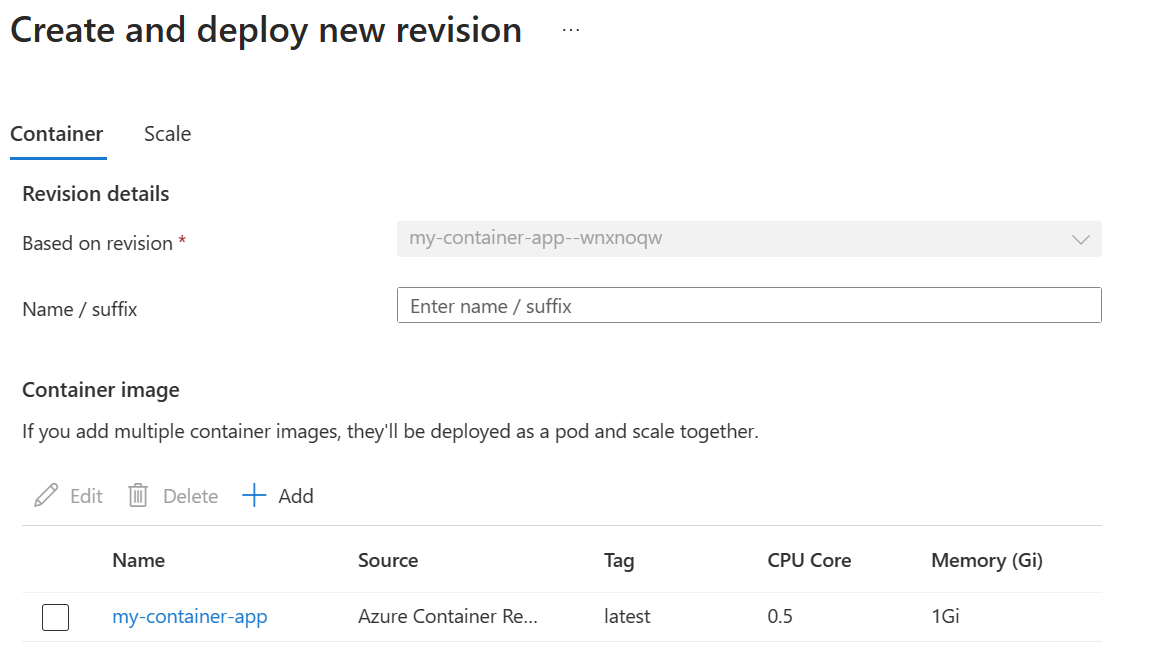
You now have two options:
- Edit the existing container image definition
- Add a new one but you must delete the existing one or your deployment will fail because the two containers are targeting the same port.
Let’s use the Add option, so click on Add in order to pull the new image that will be used to create the new revision.
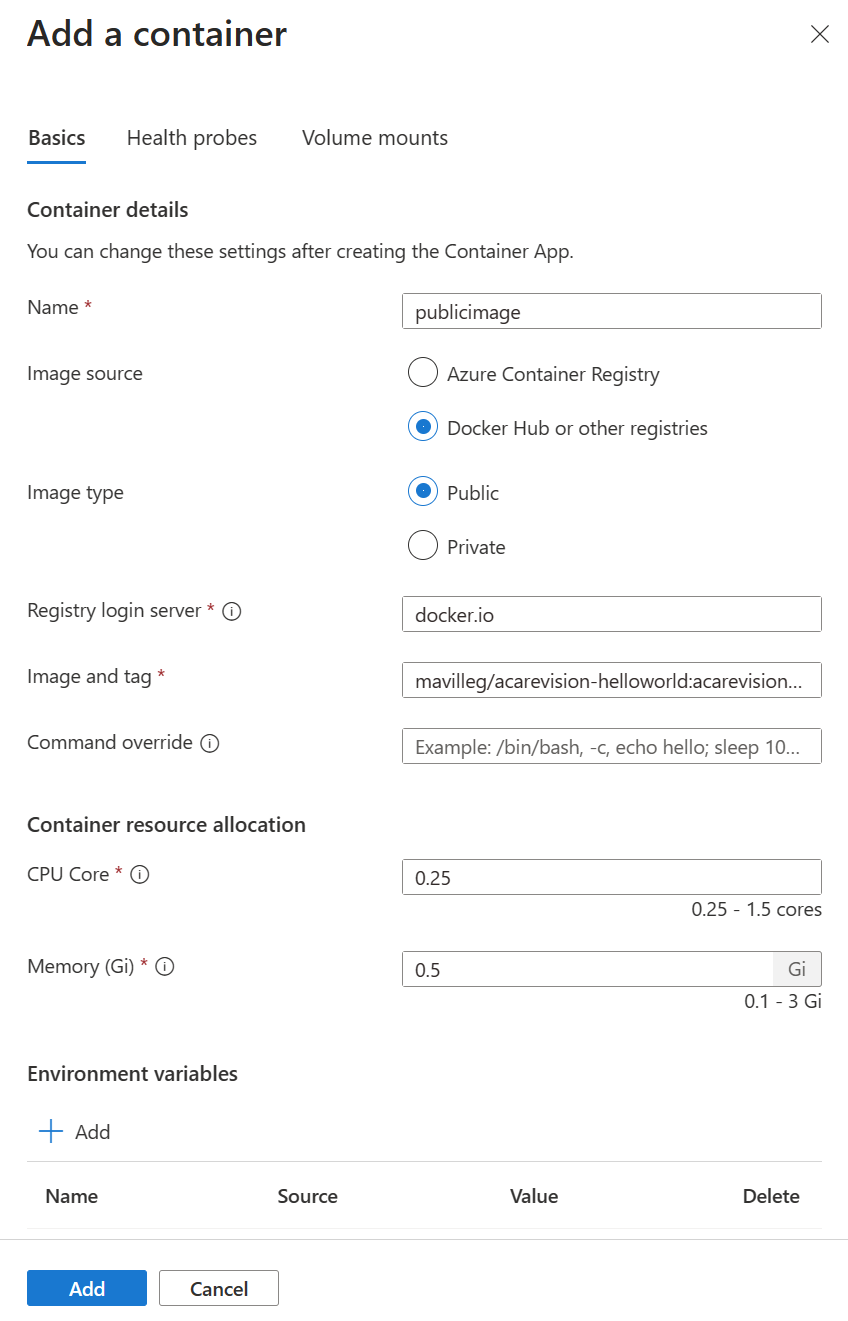
Once your new revision is provisioned, you can split the traffic between them using the revision management panel within the Azure portal. Hitting the endpoint will result serving one of the revision depending on the chosen ponderation (in %).
Note that new revisions may remain active until you deactivate them, or you have to your container app to automatically deactivate old revisions (called
single revision mode).
- Inactive revisions remain as a snapshot record of your container app in a certain state.
- You are not charged for inactive revisions.
- Up to 100 revisions remain available before being purged.
You can see all revisions using the az containerapp revision listand have more detail on a specific one using the az containerapp revision show command.
az containerapp revision list \
  --name my-container-app \
  --resource-group $RESOURCE_GROUP \
  -o table
az containerapp revision show \
  --revision <REVISION_NAME> \
  --resource-group $RESOURCE_GROUP
Remember with the revision mode and set it up on “multi”. This way, you can have multiple revisions at the same time, which is commonly used for A/B testing or blue-green scenarios. Or you can use single revision mode to automatically replace the current version by the new one.
Now, have fun and perform canary deployment. Put weight on both revisions with 50% of traffic for each.
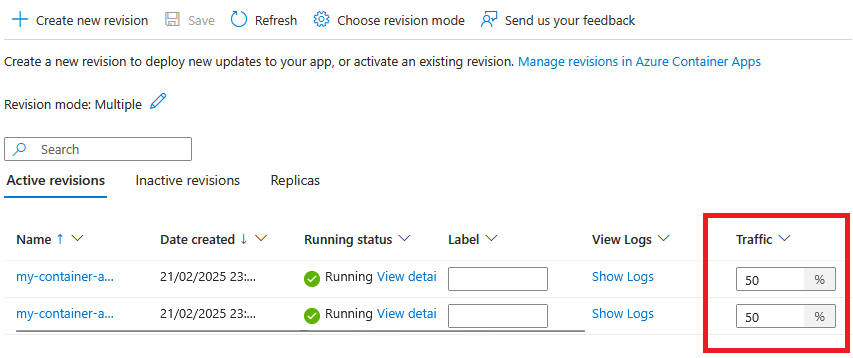
Once done, reopen the URL of your containerapp and refresh the page a dozen of times. You should randomly get the previous version or the new one.
Continuous Deployment
Azure Container Apps allows you to use GitHub Actions to publish revisions to your container app. As commits are pushed to your GitHub repository, a GitHub Action workflow is triggered which updates the container image in the container registry. Once the container is updated in the registry, the workflow creates a new revision within Azure Container Apps based on the updated container image.
The GitHub action is triggered by commits to a specific branch in your repository. When creating the integration link, you can decide which branch triggers the action.

Setup your Github repository
In order to be able to setup your continuous deployment you’ll need a GitHub account and a newly created repository. We made a public repository where you’ll find the sources of the Hello World container. Fork and then clone this repository within your own environment.
Now that you have the source code you will be able to modify it and rebuild a container that will be pushed onto Azure Container Apps.
Attach Github Actions to your container App
Now that you have a Repo to attach to your environment, you’ll have to setup the correct rights on Azure to configure the continous deployment. When attaching a GitHub repository to your container apps, you need to provide a service principal context with the contributor role. The parameter that we will need to configure within the container app are the service principal’s tenantId, cliendId, and clientSecret.
az ad sp create-for-rbac \
  --name <SERVICE_PRINCIPAL_NAME> \
  --role "contributor" \
  --scopes /subscriptions/<SUBSCRIPTION_ID>/resourceGroups/<RESOURCE_GROUP_NAME> \
  --sdk-auth
The return value from this command is a JSON payload, which includes the service principal’s tenantId, cliendId, and clientSecret.

Once those values retrieved, you will have to create an Azure Container Registry with Basic SKU, this will be use to host the newly created containers.
This registry must have the Admin User enabled, or the integration with ACA won’t work.
Open your registry and under the Access keys panel, click on Enabled to enable the user admin. Or use:
az acr update -n <acrName> --admin-enabled true
Once configured, you can move forward by attaching your GitHub repo to the container app previously deployed.
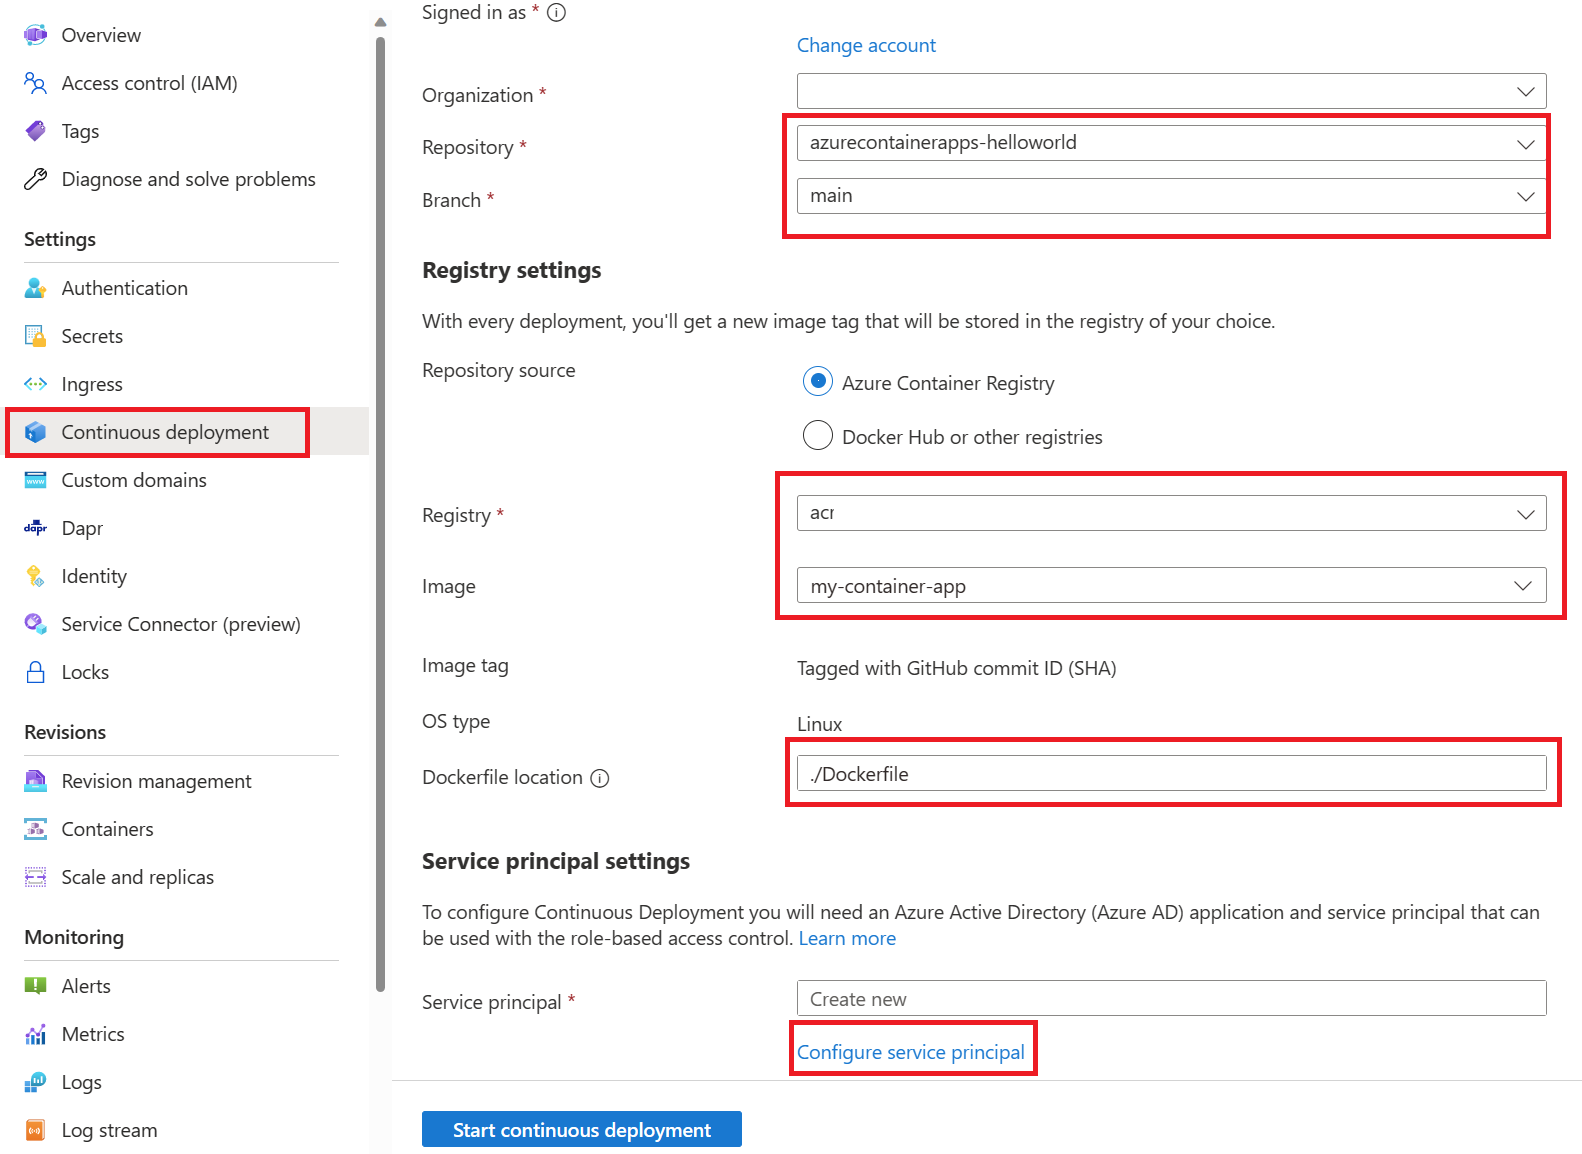
And use the credentials you previously generate for your service principal settings:
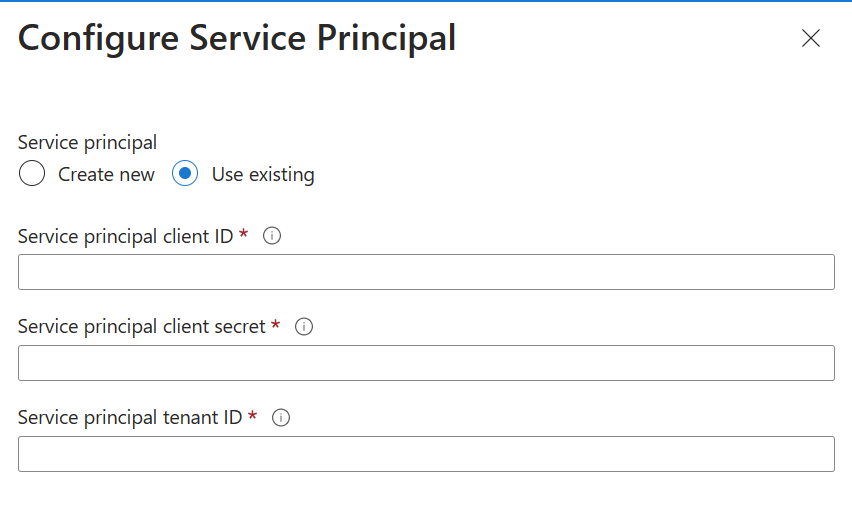
Once everything is in place you can see that a new folder .github/workflows has been added to your GitHub project. It hosts a YAML file that will allow the triggering of an automatic GitHub Action that will deploy any changes pushed onto the branch.
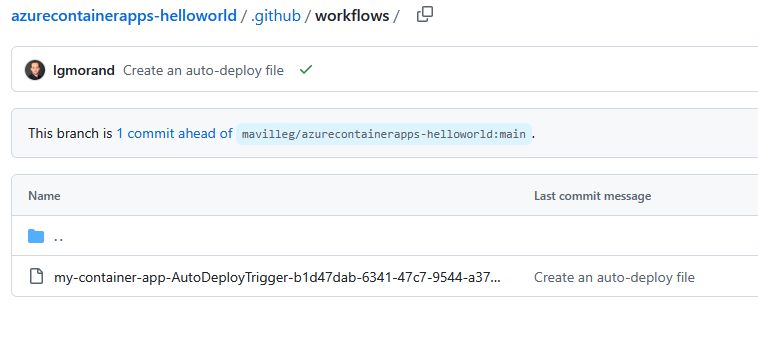
It will also automatically setup some secrets on your application to store the admin’s login to reach out to the Container Registry. We will see later in this lab how to manage those secrets.

The az containerapp github-action show command returns the GitHub Actions configuration settings for a container app. It returns a JSON payload with the GitHub Actions integration configuration settings.
az containerapp github-action show \
  --resource-group <RESOURCE_GROUP_NAME> \
  --name <CONTAINER_APP_NAME>
Let’s test that out!
Putting everything together
Open your project within VS Code (or your favorite IDE). You should see that the .github/workflows has been added. If it’s not the case, synchronize the change that has been made onto the project (git pull request).
Now you can modify the source code of the Hello World container that we are using since the beginning. For example, you could change the text above the logo under the index.html file (inside the /app folder). Change some text, commit and push your modification.
Once the change are commited you can go to your GitHub repos to see the GitHub Action occurring:

As you can see, pushing the changes (commit) automatically triggered a GitHub Action workflow that built and deployed our new container into our registry and then on our container apps under a new revision. You can validate it by going under the revision management panel and see your newly provisioned revision.
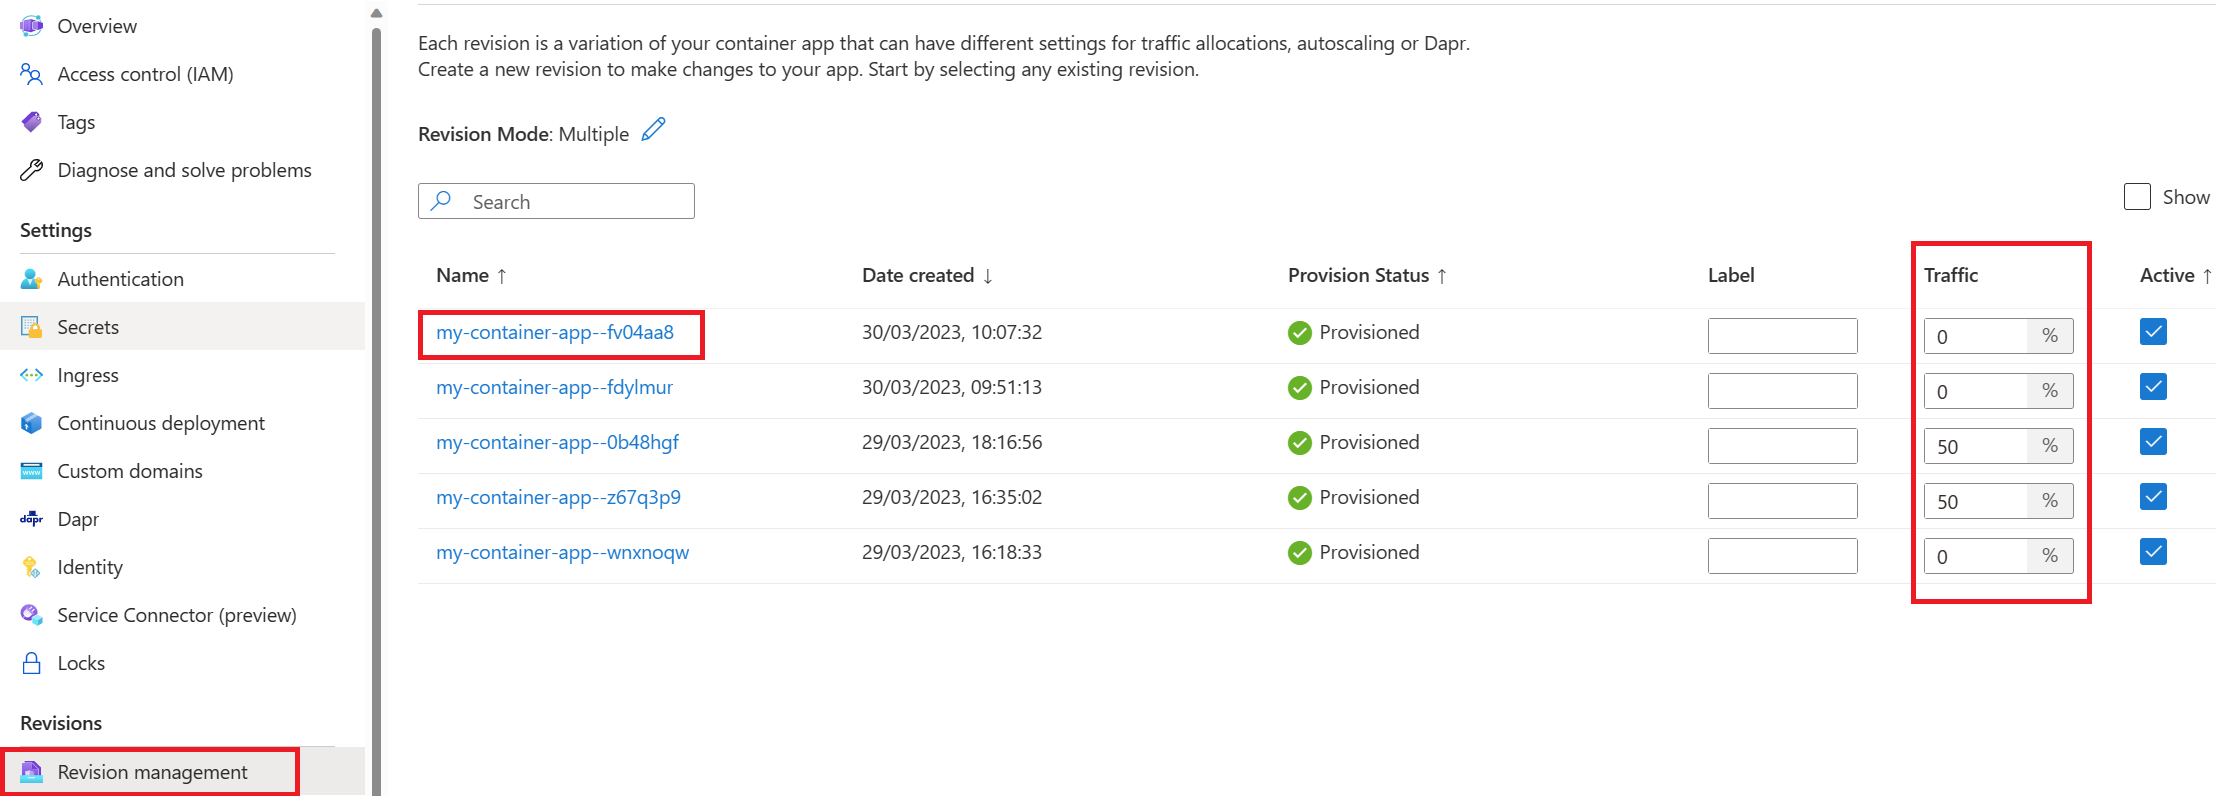
As you can see the revision is not loadbalanced yet, meaning that none of the traffic is routed to it. Supporting multiple revisions in Azure Container Apps allows you to manage the versioning and amount of traffic sent to each revision.
Once a part (or all) of the traffic is sent to your app, you can test that the newly version of your application is running correctly.
All of this can be configured as needed. Indeed, you can change whether or not your container app supports multiple active revisions. The activeRevisionsMode property accepting two values:
- multiple: Configures the container app to allow more than one active revision.
- single: Automatically deactivates all other revisions when a revision is activated.
Enabling single mode makes it so that when you create a revision-scope change and a new revision is created, any other revisions are automatically deactivated.
You could also manage the different aspects of a revision using the az containerapp revision command.
Conclusion
With this first lab you learned the main concepts of Azure container apps and its management.
In Azure Container Apps, individual container apps are deployed to a single Azure Container Apps environment, which acts as a secure boundary around groups of container apps. Container Apps in the same environment are deployed in the same virtual network and write logs to the same Log Analytics workspace.
Azure Container Apps manages the details of Kubernetes and container orchestrations for you. Containers in Azure Container Apps can use any runtime, programming language, or development stack of your choice.
The Azure Container Apps application lifecycle revolves around revisions. A revision being an immutable snapshot of a container app. When you deploy a container app, the first revision is automatically created. More revisions are created as containers change, or any adjustments are made to the configuration.
Let’s move forward with a more complex scenario around the concepts revolving around Microservices Architecture.
Lab 2 - Micro-services
Context
Now that you successfully deployed a simple application, let’s see how Azure Container Apps could help with more complex applications. You are going to deploy a full micro-services application named Red Dog. Microservice architectures allow you to independently develop, upgrade, version, and scale core areas of functionality in an overall system. Azure Container Apps provides the foundation for deploying microservices featuring:
- Independent scaling, versioning, and upgrades
- Service discovery
- Native Dapr integration
A Container Apps environment provides a security boundary around a group of container apps. A single container app typically represents a microservice, which is composed of container apps made up of one or more containers.
Dapr integration
When implementing a system composed of microservices, function calls are spread across the network. To support the distributed nature of microservices, you need to account for failures, retries, and timeouts. While Container Apps features the building blocks for running microservices, use of Dapr provides an even richer microservices programming model. Dapr includes features like observability, pub/sub, and service-to-service invocation with mutual TLS, retries, and more.
For more information on using Dapr, see Build microservices with Dapr.
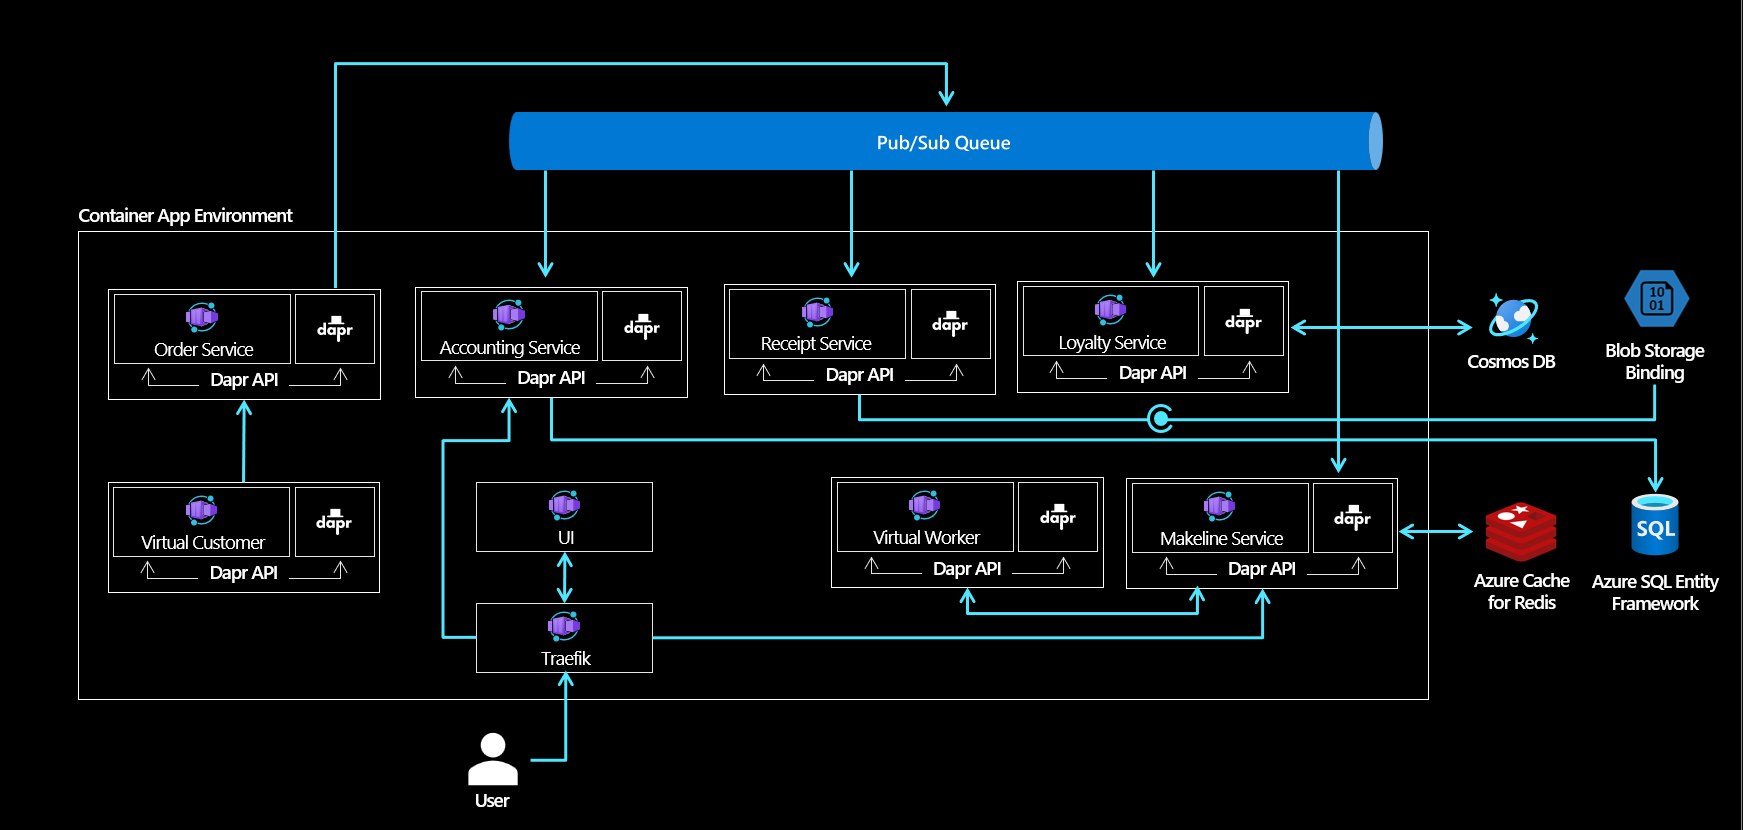
Red Dog application is a simplified e-shop application with customers making orders and these orders being processed by workers. In parallel, orders, receipts, and accounting are stored in different persistent systems. The e-commerce platform does not contain any UI except a dashboard to monitor the orders.
The Red Dog application is developed with .NET and Javascript. As mentioned above, it utilizes Dapr (Distributed Application Runtime) so it can easily be adapted to multiple scenarios.
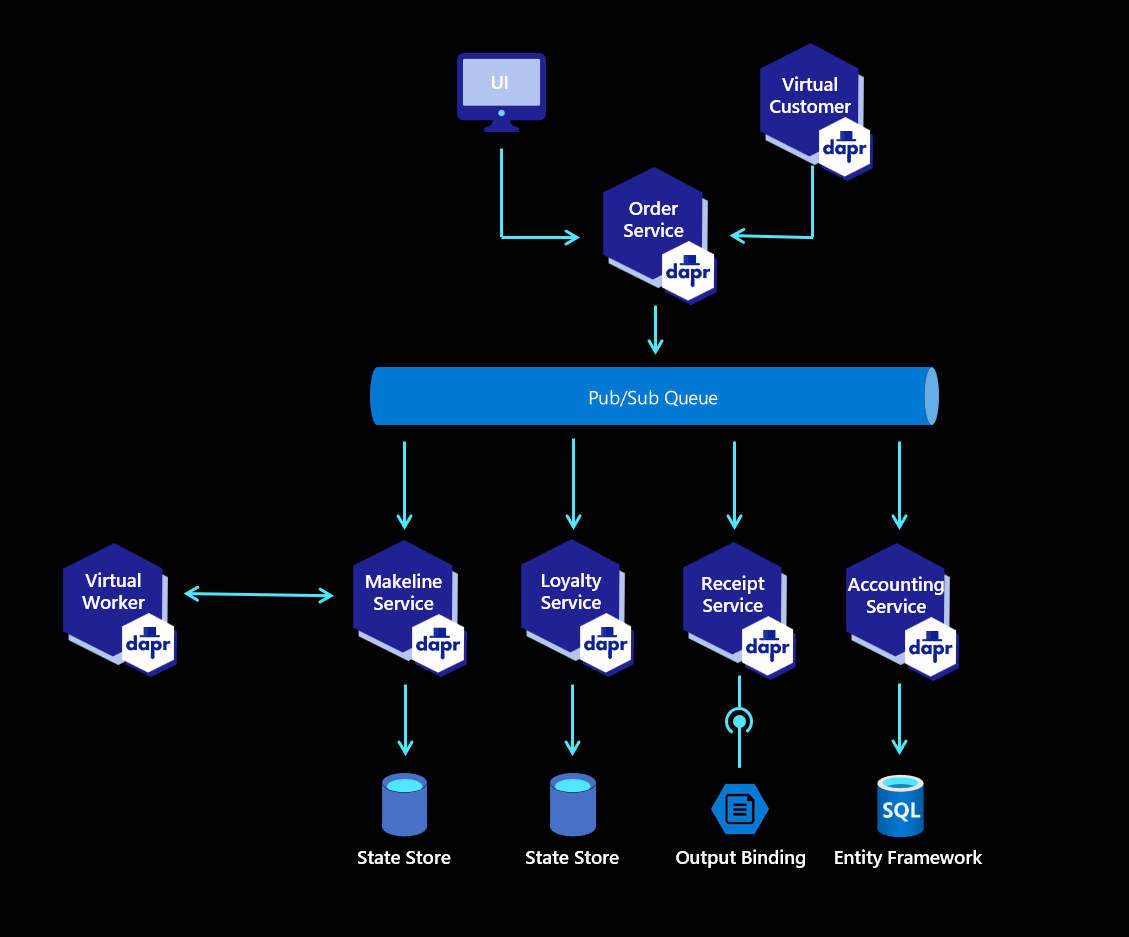
The application may seem complex but it’s not and you won’t have to fully understand it to finalize the workshop.
Here are the descriptions of the different components of the application.
| Service | Description |
|---|---|
| AccountingService | Service used to process, store and aggregate order data, transforming customer orders into meaningful sales metrics that can be showcased via the UI |
| Bootstrapper | A service that leverages Entity Framework Core Migrations to initialize the tables within Azure SQL DB based on the data model found in Reddog.AccountingModel |
| LoyaltyService | Manages the loyalty program by modifying customer reward points based on spend |
| MakeLineService | Responsible for simulating and coordinating a ‘queue’ of current orders. Monitors the processing and completion of each order in the ‘queue’ |
| OrderService | Basic CRUD API that is used to place and manage orders |
| ReceiptGenerationService | Archival program that generates and stores order receipts for auditing and historical purposes |
| UI | Dashboard showcasing order/sales data related to a single hub location and/or for visibility across Hubs via the Corporate Dashboard in Hybrid scenario |
| VirtualCustomers | ‘Customer simulation’ program that simulates customers placing orders |
| VirtualWorker | ‘Worker simulation’ program that simulates the completion of customer orders |
| CorporateTransferService* | Azure Function responsible for monitoring order activity via RabbitMQ i.e. order placement and order completion within the context of a specific hub location and propagating these order activities to an Azure Service Bus for Corporate Hub consumption and visibility |
*These services are specific to the Hybrid retail scenario and may not be applicable for other deployment patterns.
Deploy the solution
Deploying the app
The Red Dog application is based on containerized services and Azure PaaS services such as Storage accounts, Azure SQL Database, Redis, or CosmosDB.
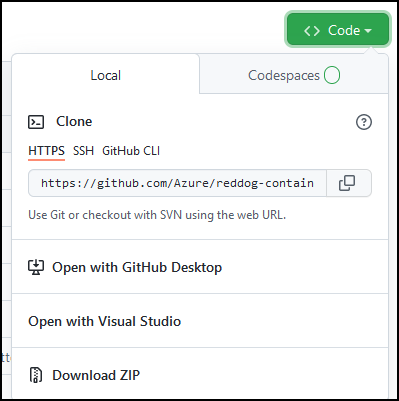
Start by forking the dedicated repository (azure/reddog-containerapps) to have your copy on your GitHub account.
Once the repo has been forked, clone the repository on your local computer or within your Cloud Shell.
Browse the contents of the repository. The most interesting part is the “deploy/bicep” folder. Using Infrastructure as code and the Bicep technology, it is possible to deploy all the components in one command line, including the Azure Container Apps instance, the different PaaS services but also the containerized applications.
Be sure to install Bicep first. Next, to deploy the full environment, go to the deploy.sh file and update the subscription id and edit the RG variable (resource group) to have a unique name for you, then log in to Azure and execute the script in a terminal.
Warning Don’t forget to edit the deploy.sh file first !
# *nix only
#export RG="reddog" #comment this line
export RG="reddog-<randomnumber>" #make sure this to have a unique name
export LOCATION="eastus2"
export SUB_ID="<YourSubscriptionID>"

...
. deploy.sh

Note: The installation should work smoothly. Deploying the full environment will take around 15 minutes (sometimes more). The provisionning of the Redis part is very long but you can continue with the next lab while the deployment continues - or you can tak a coffee break. If the deployment fails (display an error message), just run the script again, it’s idempotent. If you have warnings telling you that commands are not found, it probably means that the file’s encoding (LF/CLRF) is incorrect for your system.
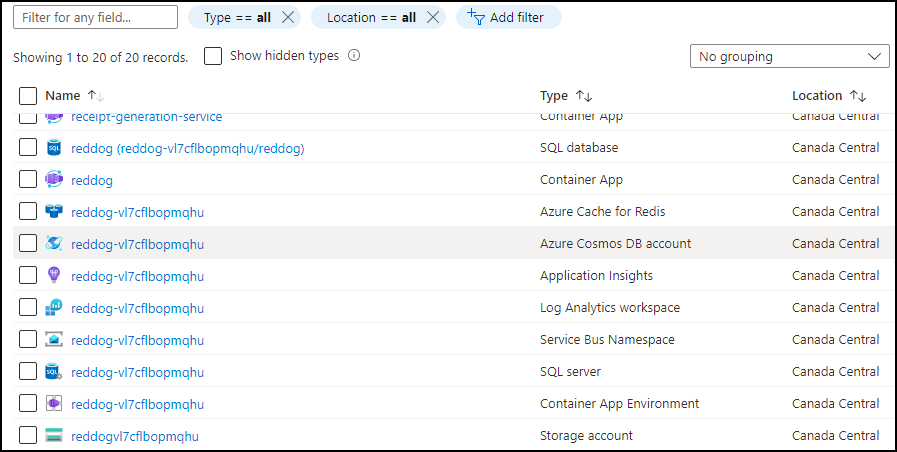
Once the deployment is successful, open the Azure portal and notice the new resource group named “reddog” (or something else depending on how you change the variable in the script).
When you open it, you can see that all resources have been successfully created and deployed.
Monitor the platform
Observability
Observability is critical for any application. To ensure that everything is fine but also to detect/anticipate any issue on the platform, you should be able to have a 360° view.
Testing the app
We already know that components have been deployed successfully but are they fully working? To check the platform, several visual tests can be done. Start by opening the Reddog frontend UI portal in a browser.
Remember the architecture schema of the Reddog platform. The frontend is the UI Container App which is exposed internally and thus not reachable outside the (managed) kubernetes cluster. In front of the UI is the Traeffik ingress controller which is the Reddog Container App, exposed publically (Internet).
To find the URL of the portal, open the Reddog Container App. In the overview tab, you should find the generated FQDN URL.

Copy the URL in any browser to discover a nice dynamic dashboard :

Did you notice the delay for the page to be displayed the first time ? It is caused by the fact that the running containers are removed (scaled to zero) when the platform is not used. You are going to see in detail how to control this behavior further in this workshop.
Get Logs
Metrics are important, but it is also important to be able to get the logs of the application to be able to debug or understand any misbehavior.
In Azure Container Apps, logging agents are capable of capturing all stdout/stderror messages sent by containers. The messages are then pushed to Azure Log Analytics, allowing you to have in one place, without any specific tooling, all logging in one place.
As a message is logged, the following information is gathered in the log table:
| Property | Remarks |
|---|---|
RevisionName |
|
ContainerAppName |
|
ContainerGroupID |
|
ContainerGroupName |
|
ContainerImage |
|
ContainerID |
The container’s unique identifier. You can use this value to help identify container crashes. |
Stream |
Shows whether stdout or stderr is used for logging. |
EnvironmentName |
Try to retrieve the logs on the UI container. You can do it using command-line or through the portal
On the Azure Portal, open Logs Analytics. You can use the left part of the screen to see the tables and columns and build a query using Kusto language.
The query to get the logs of the UI container is :
ContainerAppConsoleLogs_CL
| where ContainerAppName_s == 'ui'
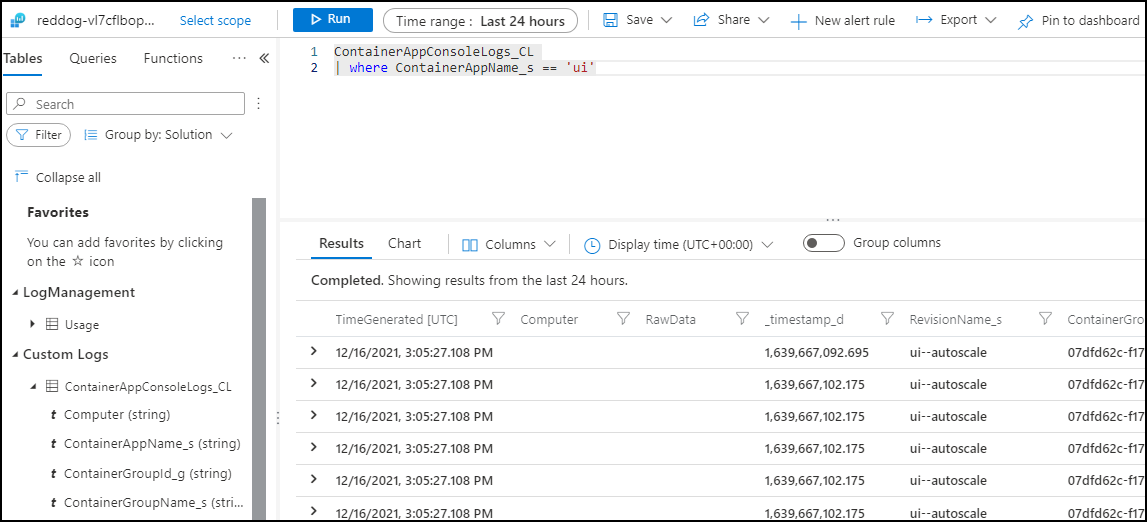
The second way of doing it is to use the command line and the Azure CLI. (it may ask you to install a CLI extension first).
az monitor log-analytics query \
  --workspace <LOG_ANALYTICS_WORKSPACE_CLIENT_ID> \
  --analytics-query "ContainerAppConsoleLogs_CL | where ContainerAppName_s == 'ui' | project ContainerAppName_s, Log_s, TimeGenerated | take 3" \
  --out table
Here, the query is more complex to select the columns to display and the number of lines we want to return.

That’s it. No need to install specific monitoring tool (i.e. Prometheus) nor need to connect interactively to your container to retrieve its logs.
Get Metrics
Application Insights, a feature of Azure Monitor, is an extensible Application Performance Management (APM) service for developers and DevOps professionals. Use it to monitor your live applications. It will automatically detect performance anomalies, and includes powerful analytics tools to help you diagnose issues and to understand what users actually do with your app.
Lucky for us, Application Insights has been automatically deployed and uses the metrics/logs stored automatically in Log Analytics by Azure Container Apps. As you can see, if you dig a little bit, Application Insights can help to see metrics, errors, users flow, and so much more.
Start by opening Application Insights and watch the main metrics of the platform.
In the resource group, look for the Application Insights resource. Once you open it, you can see main metrics such as failures (should be empty), the average response time and the requests per second.
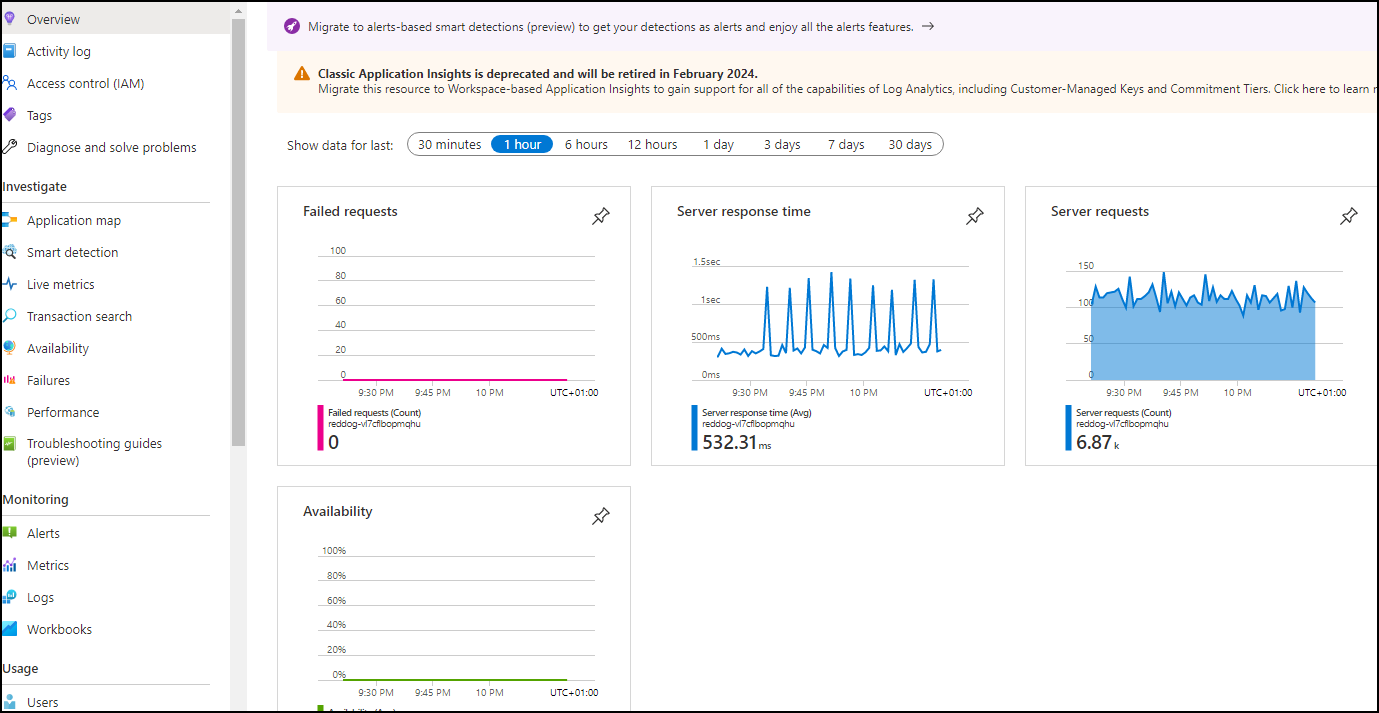
If you click on one chart (i.e. response time), you’d be brought to performance tab where you can see specific metrics for each micro-service.

Another way to get the health of your platform is to use the “magic map” feature of Application Insights to get an overview of the whole platform. Find and analyze the application’s map.
On the left part, open the Application Map menu. From the logs only, it is capable of drawing a map of your microservices platform, showing interactions between components, average performance and even failure rates when an error occurs.
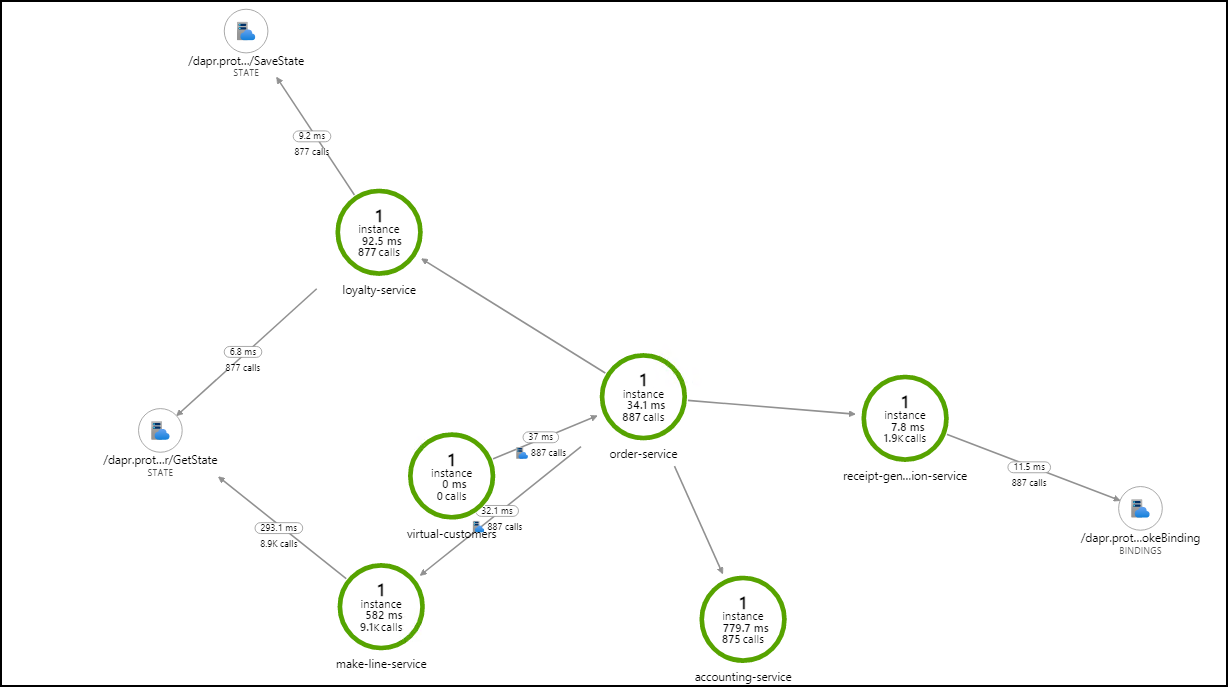
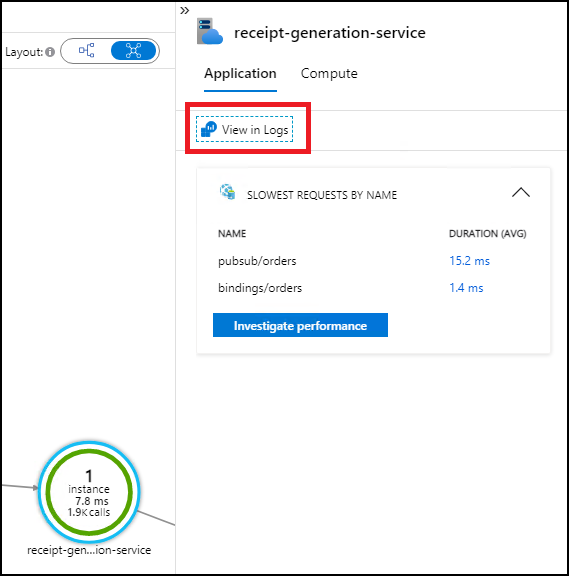
Use the map to quickly get the logs of a specific micro-service, for instance, the receipts generator service:
On the map, click on one micro-services, then in the side panel which opens, click on View logs.
It should open Logs analytics and automatically generate for you the query which was used to draw this micro-services on the map.
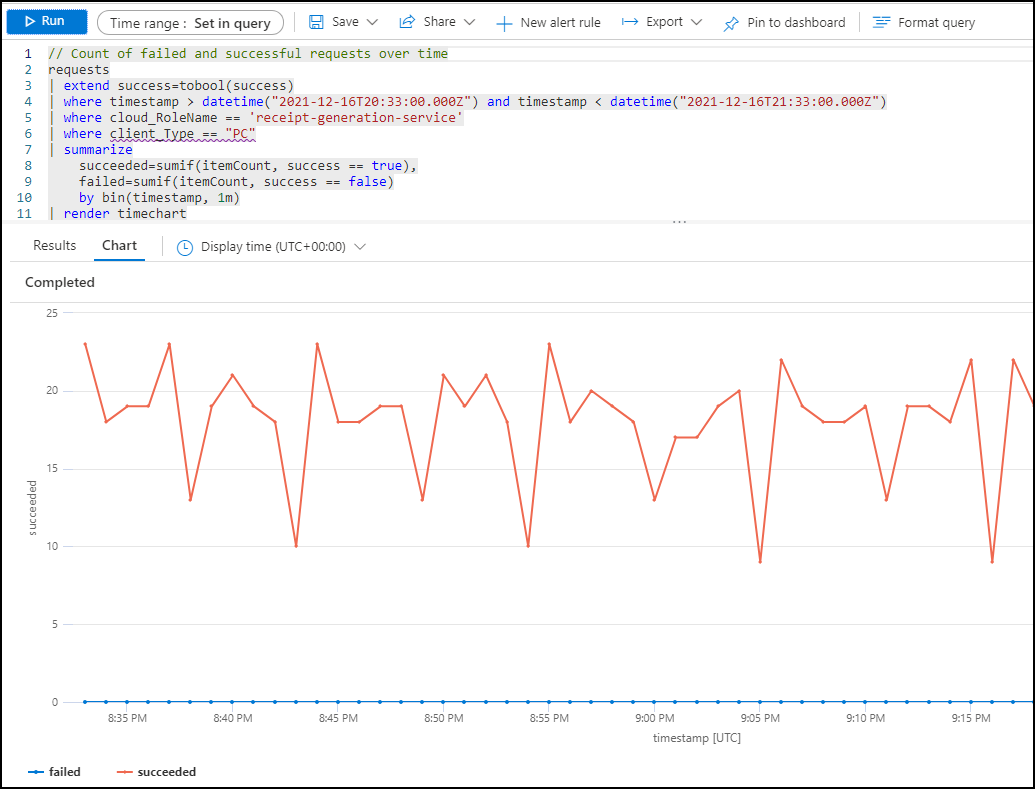
It’s just the overview of observability but it shows how well monitoring is integrated within Azure Container Apps.
Secret Rotation
One of the main concerns of the management of the lifecycle of an application is its secret/certificate management. Indeed, once in while you’ll have to make rotation on your key/secret/certificate for security reason (leak or just good pratice). Let’s see how secrets management is done with Azure Container Apps.
Azure Container Apps allows your application to securely store sensitive configuration values. Once defined at the application level, secured values are available to containers, inside scale rules, and via Dapr.
- Secrets are scoped to an application, outside of any specific revision of an application.
- Adding, removing, or changing secrets does not generate new revisions.
- Each application revision can reference one or more secrets.
- Multiple revisions can reference the same secret(s).
Manage your secret
In the deployed Reddog application, the container receipt-generation-service has two secrets to connect itself to a service bus sending receipts that he is posting onto a storage account. One is directly binded to the container app, the other one leverage Dapr components, to share the configuration and isolate configuration from application itself.
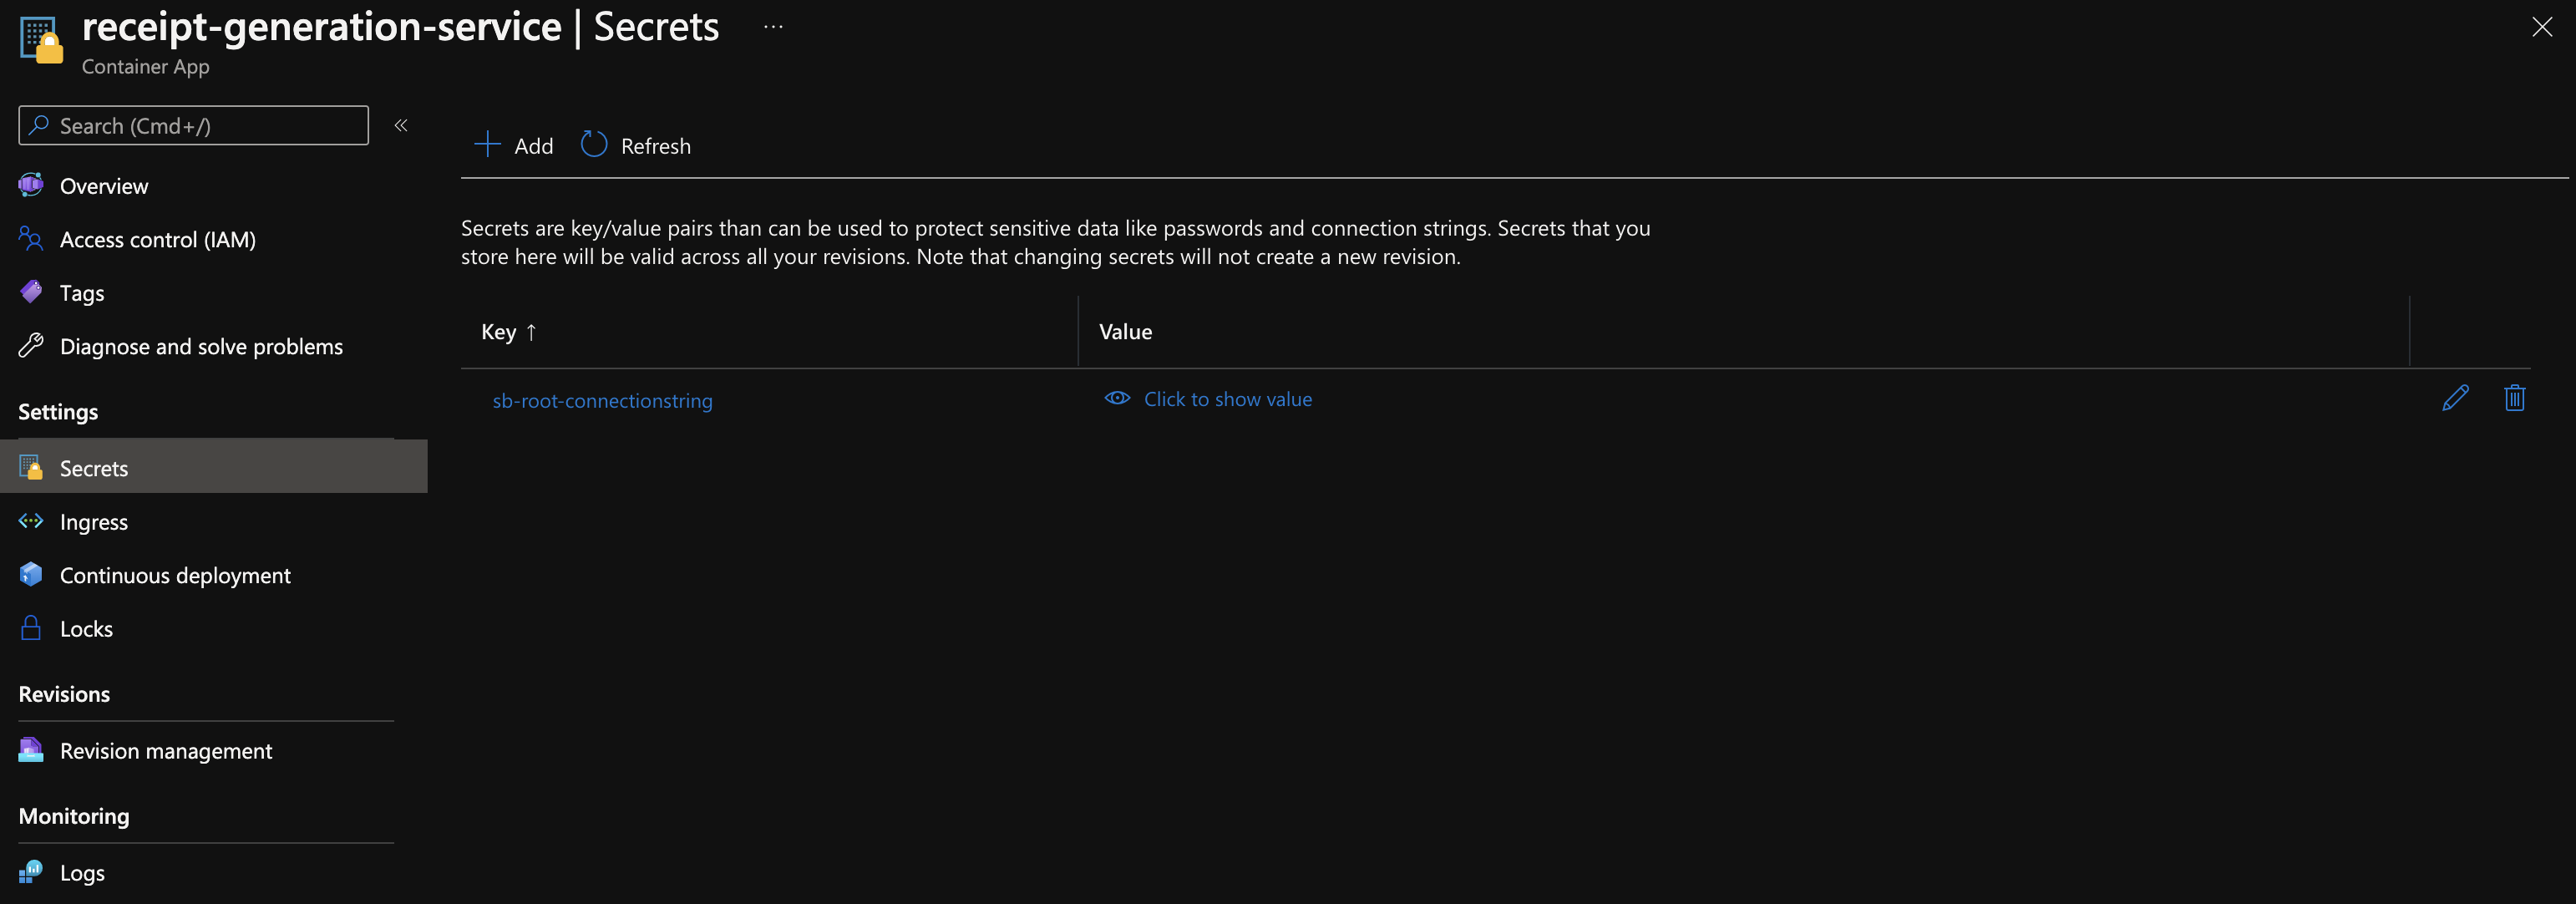
Every second, this service receives a receipt which is then saves it into the blob storage account receipts. We will simulate a rotation of the storage account access key.
To do so, go to the storage account in order to make the rotation of both primary and secondary keys.
Go to the storage account under the Access key blade in and click the Rotate keys button.
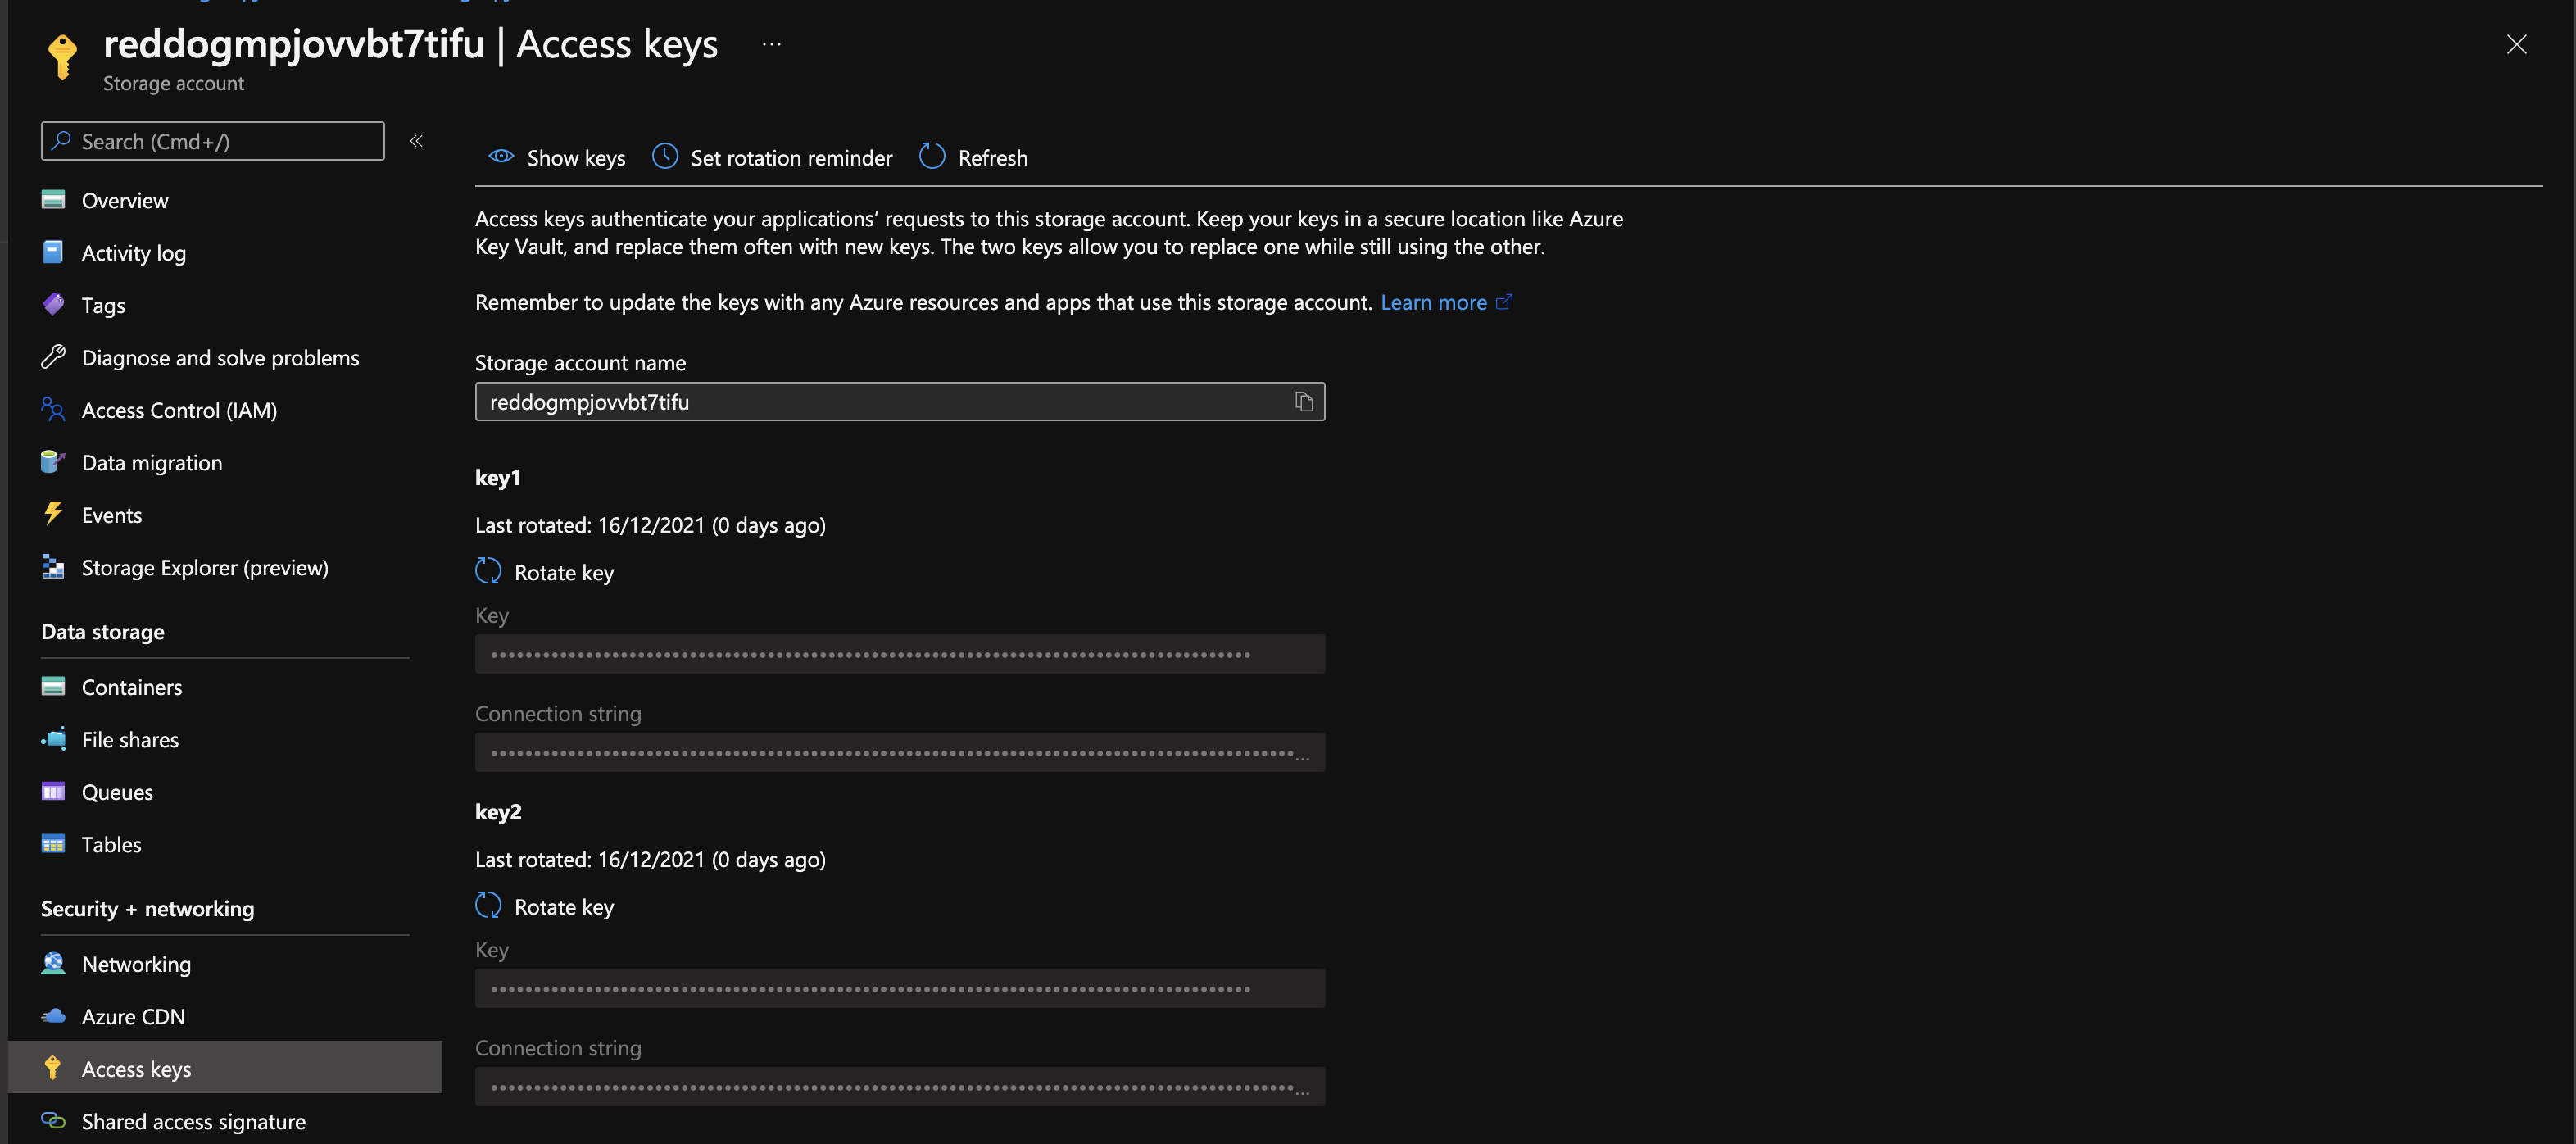
Once done you’ll see that the blob storage is no longer receiving any receipts from our application. You can validate easily this by deleting the “Receipts” blob container and recreate it after few seconds (Azure may display an error message, just retry after few seconds). The blob container should remain empty because the application does not have the rights any more to write new receipts.
Fetch the new secret
In order to set back the connection between the storage account and the receipt-generation-service you’ll have to retrieve the new key and edit the value of the key blob-storage-key.
On the storage account under the Access key blade copy the key value.
Then go to the Dapr blade inside the receipt-generation-service container app environment panel and find the Click here to manage your Dapr components link.
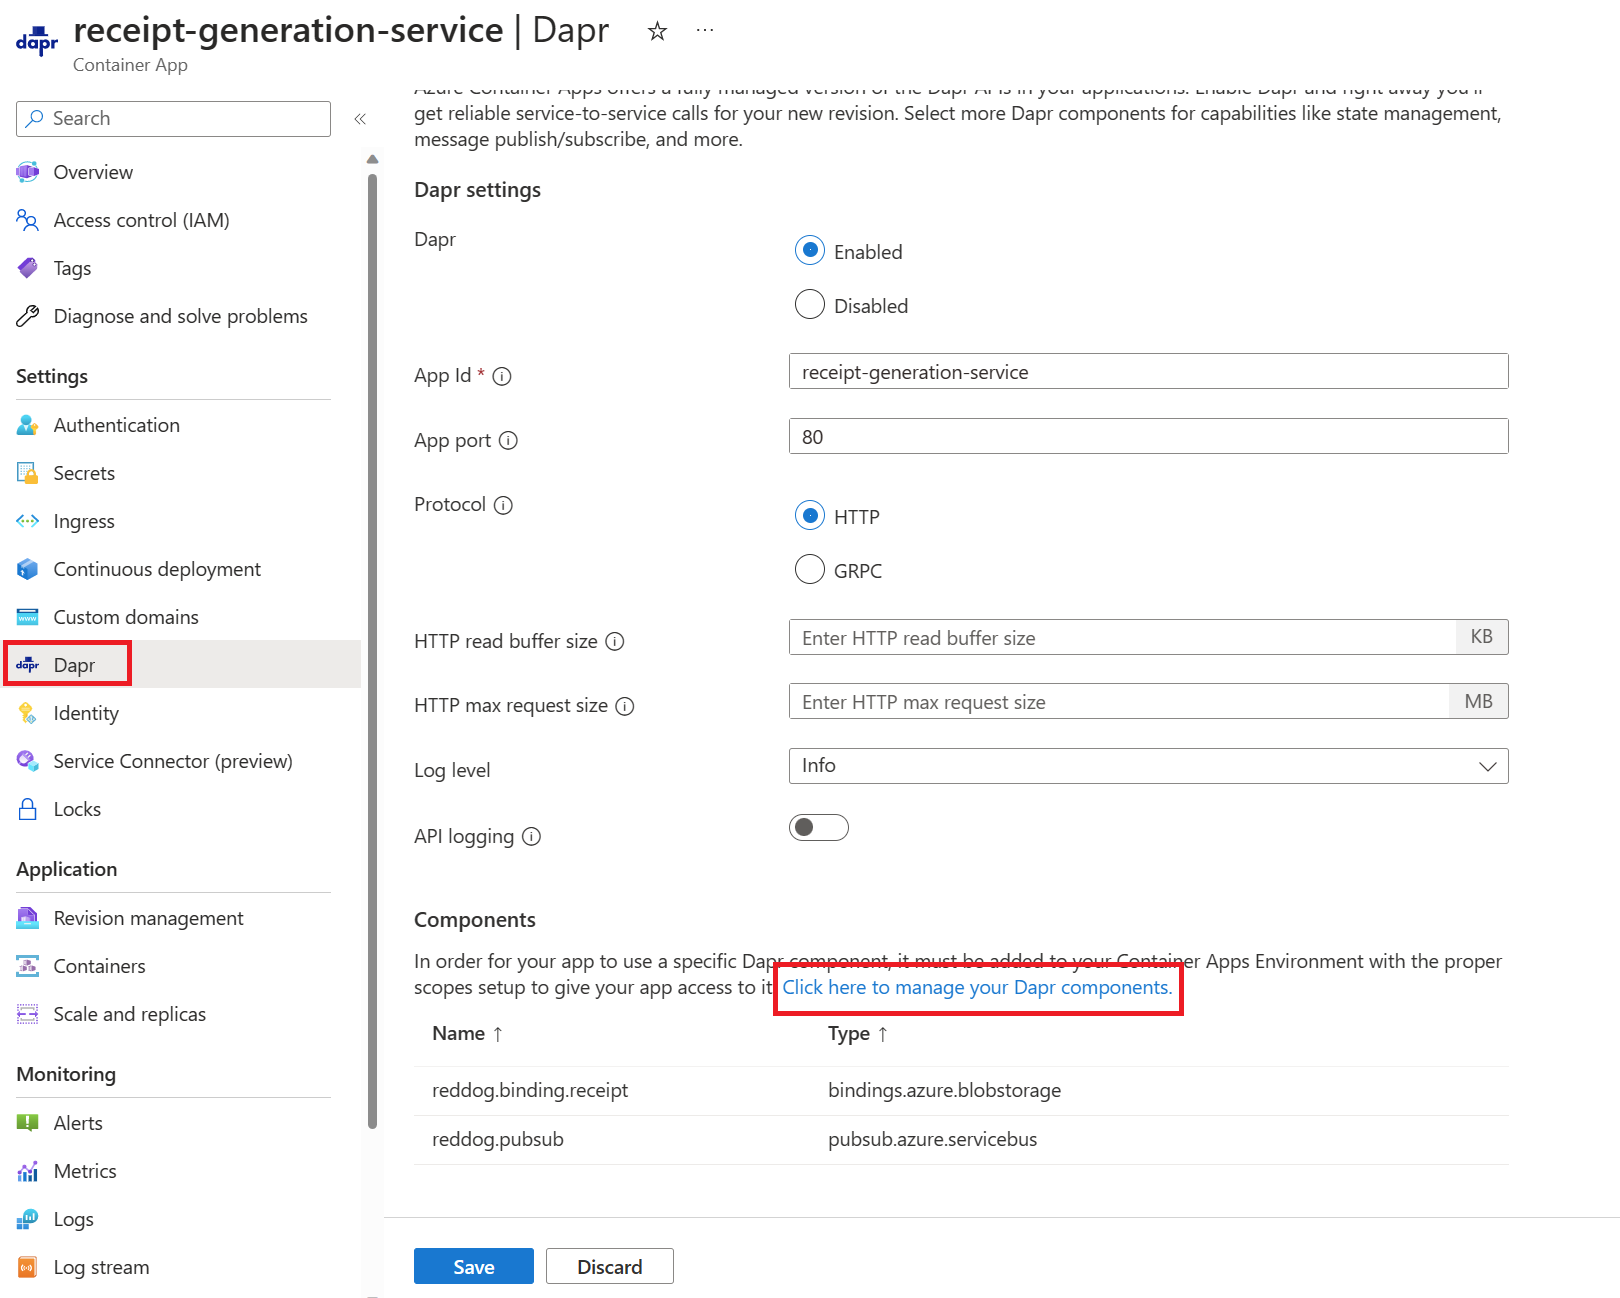
Then edit the reddog.binding.receipt component to update the old blob-storage-key value with the newly copied one.
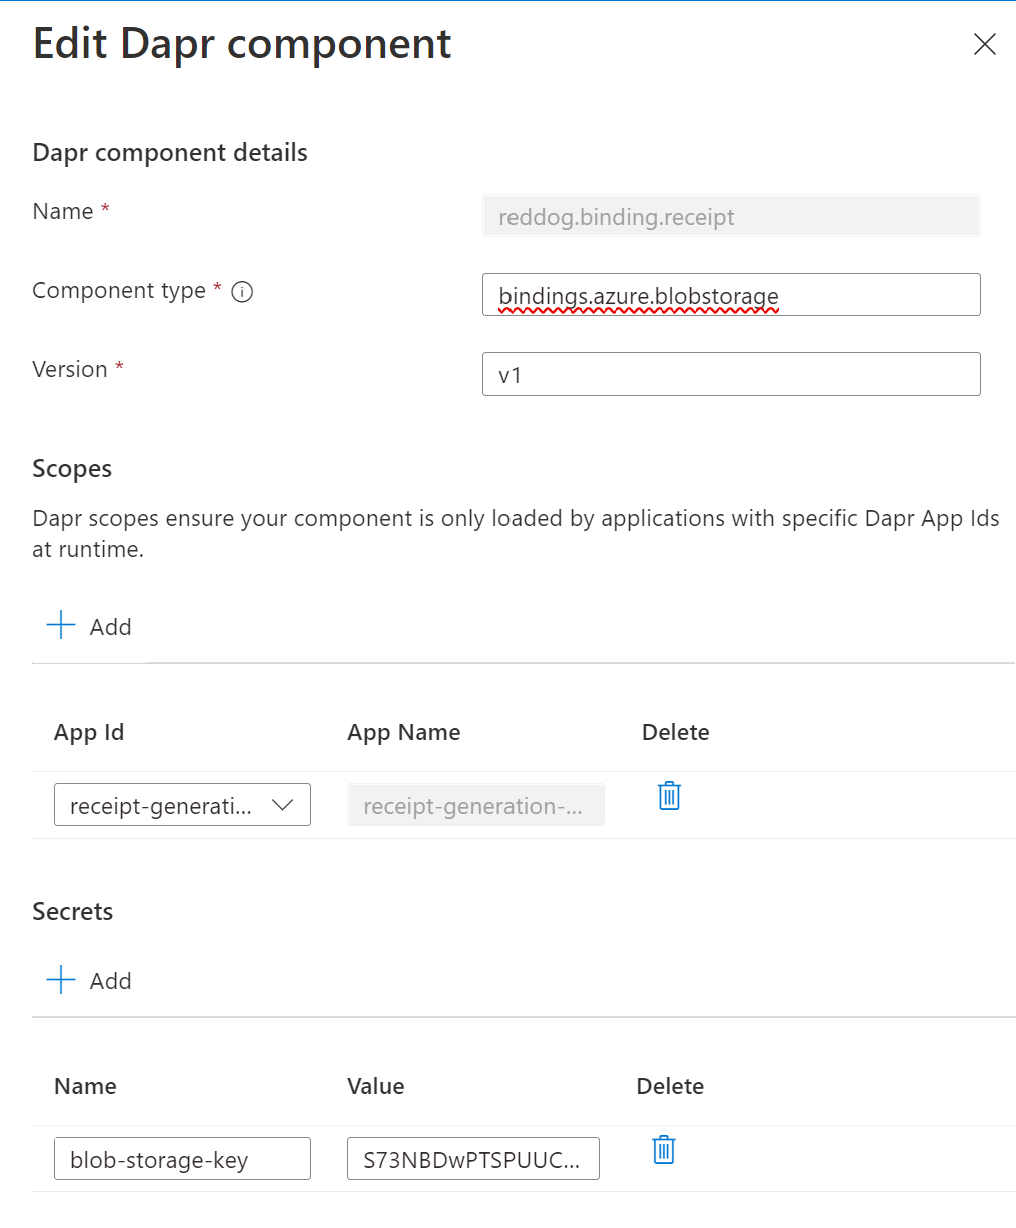
Note that you can also add directly the secret to the container app, without using Dapr. This way, you can directly view/edit Secrets in the container app blade.
Note that this change is an application-scope change that won’t recreate a revision. Having said that, the revision has to be restarted (or a new one has to be deployed) in order to propagate the new value of the key. This should be automatically done by saving the changes made to the key. However, if it’s not the case you’ll have to restart the revision using the CLI.
az containerapp revision restart \
  --revision <REVISION_NAME> \
  --name <APPLICATION_NAME> \
  --resource-group <RESOURCE_GROUP_NAME>
Now, if you get back to the receipts blob you should see all the receipts being received again. Note that you’ll also see the receipt that occured during the rotation time because of the retention period of the service bus. This demonstrate also how a well developed application is essential to its resiliency and its fault tolerance.
Scalability
Scalability
The scalability is an important part of the resiliency of an application. Your application should be able to handle an increase of the load with failing. In the cloud-native world, especially Kubernetes, scaling is done manually but can also be managed through autoscaling based on CPU/Memory usage by creation Horizontal Pod Autoscaling (HPA) objects.
Azure Container Apps manages horizontal autoscaling through a set of declarative scaling rules to enrich the mechanism of HPA. By default, Azure Container Apps scale to zero and pause billing when not in use. As a Container App scales out, new instances of the Container App are created on-demand. Container Apps supports many scale triggers including HTTP and event-based triggers using Kubernetes Event-Driven Autoscaling (KEDA). KEDA is a rich autoscaler with many event scaler options continuously contributed by the community. For more information about supported scale triggers, see KEDA Scalers.
The list of triggers to scale (in/out) a Container App are :
- CPU
- Memory
- HTTP requests
- Event-driver (any one supported by Keda)
Scale with Azure Container Apps
In Container Apps, scalability is managed through the revisions. Each revision contains scaliblity limits (min & max replicas) but can also contain rules to autoscale the application. To see the current number of replicas used by your Container App, open the Metric blade from the Monitoring section of your Container App :
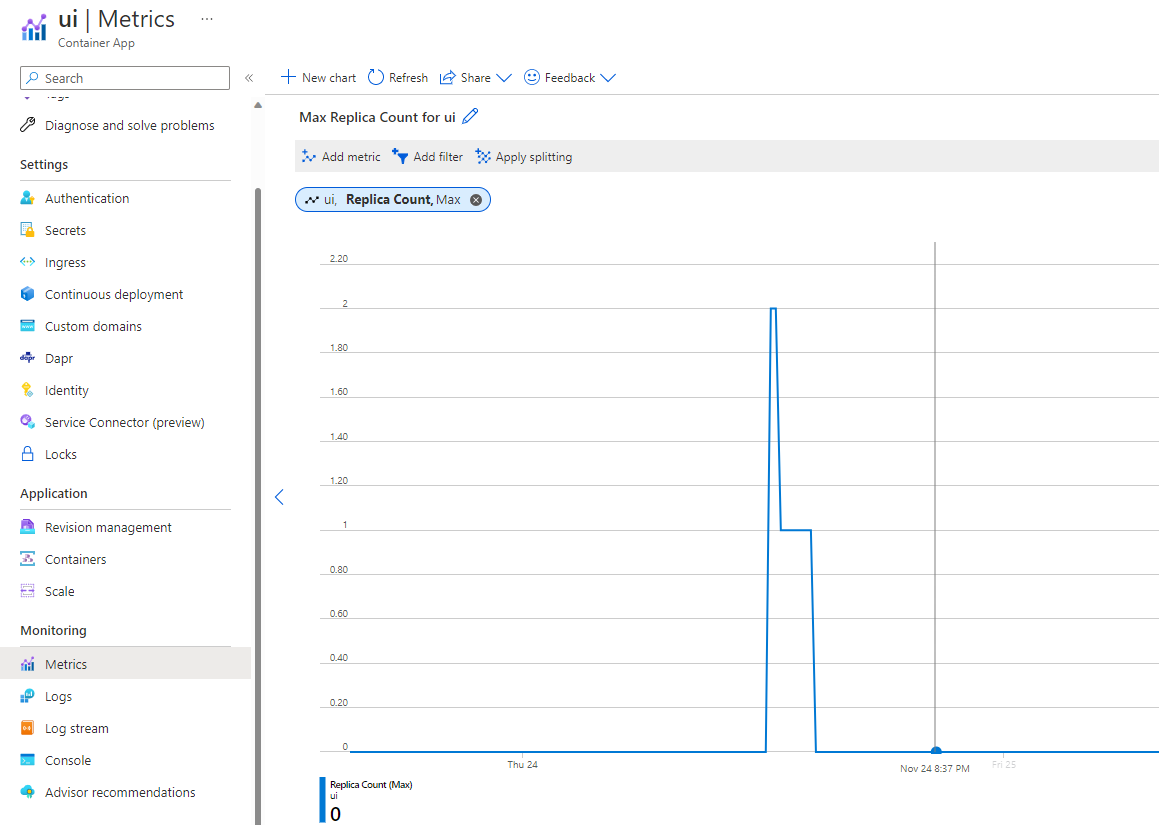
In our case, the UI app has a min limit equals to 0, a max limit of 10, and no autoscaling rules.

Let’s create a new revision with a new scaling rule. The revision should :
- have a suffix/name “autoscale”
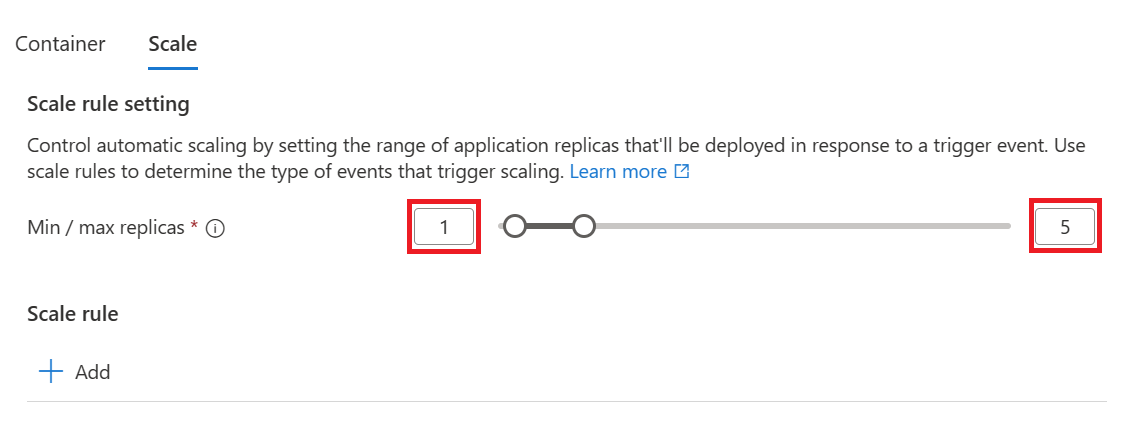
- have a minimum limit of 1 replica
- have a maximum limit of 5 replicas
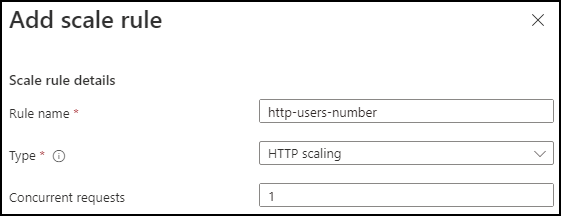
- have an HTTP autoscaling rule where the maximum of concurrent requests is equal to 1 (we want one replica per user)
Open the UI Container App and the Revision Management tab. Click on Create a new revision. In the first page, specify a name suffix, for instance autoscale and click on the Next button.
In the scale part, configure the limits between 1 and 5 replicas.
Then add a rule with HTTP Scaling type and one concurrent request.
Click on the Create button, a new revision should be created with 100% of ingress sent to it :

Once done, your application should be ready to autoscale.
Overload our container
It’s time to check that our container autoscales when users connect to it.
Install a load testing tool
The simpler way to load test our platform is to use a small command-line tool to simulate a large number of requests. You are going to use Vegeta but you can replace it by any other load testing tool if you prefer.
Start by installing the latest version of Vegeta
# download vegeta
curl -LO https://github.com/tsenart/vegeta/releases/download/v12.8.4/vegeta_12.8.4_linux_amd64.tar.gz

# unzip the app
tar -zxvf vegeta_12.8.4_linux_amd64.tar.gz

# move bin into /usr/bin
sudo mv ./vegeta /usr/bin/vegeta

# check the install
vegeta --version
You need to create a file containing the endpoints to call. The endpoint is the exposed endpoint of the Reddog application which goes to the Traeffik app.
Create a file named targets.txt and copy the URL of your application.
GET https://url-public-endpoint-of-reddog-app
Then run Vegeta with the attack command. If no specific parameters are given, Vegeta will make 50 requests per second on the defined targets and will not stop until you stop it. You can also specify requests per sec and the duration with respective parameters rate and duration.
Run the following command line and let Vegeta generating requests.
vegeta attack -targets targets.txt -rate=20 and -duration=30s.
After few seconds, check that the number of replicas of the UI Container App has increased.
Open the ui Container App and in the metric blade, check the number of current replicas during the last 30 minutes with a 1 minute granularity :
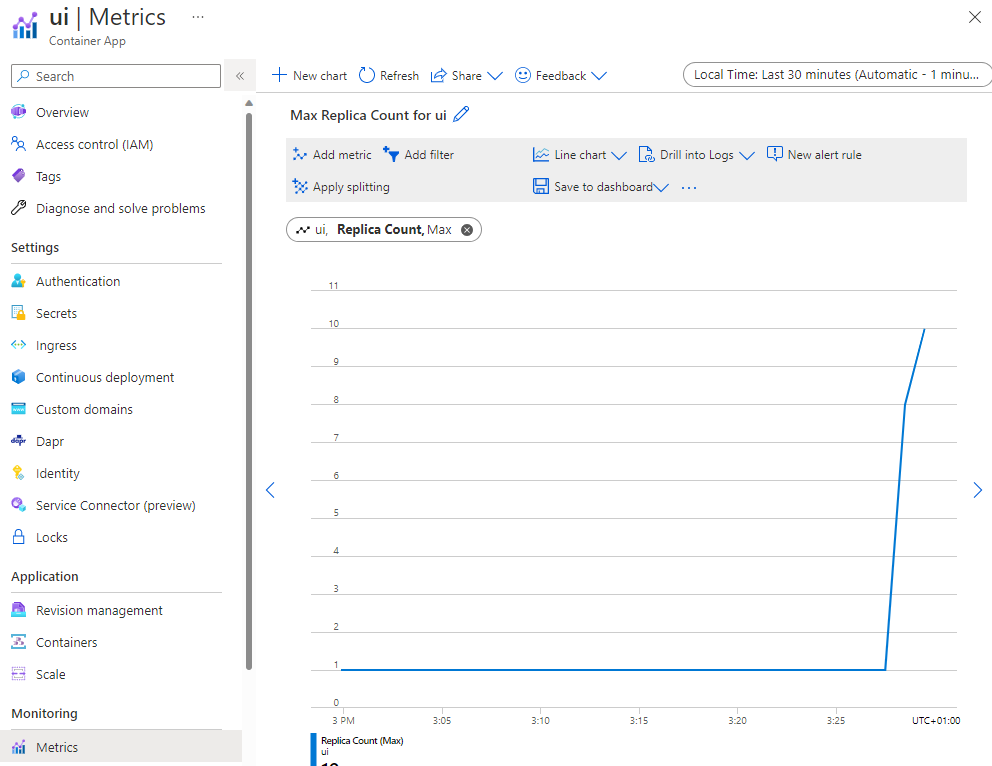
We can confirm that autoscaling created one replica per request (with around 20 requests in parallel), but the scaling out never went above five replicas due to the max limit defined in the revision.
Close Vegeta and any browser tab which displays the Reddog application, and within few minutes, you should be able to observe that UI container App scales down automatically to one replica (the minimum you set previously) because it is not overused anymore.
Lab 3 - Private environment
Context
As we seen, Azure Container Apps run in a context called an Environment. This environment is supported by a virtual network that is automatically generated when the resources are created. Generated VNETs are inaccessible to you as it is created in Microsoft’s tenant. To take full control over this VNET you have to provide an existing VNET to Container Apps as you create your environment. In that case you’ll have a new ingress configaration that is enabled: the accessibility level. Two different levels of accessibility are available:
- External: Container Apps environments deployed as external resources are available for public requests. External environments are deployed with a virtual IP on an external, public facing IP address.
- Internal: When set to internal, the environment has no public endpoint. Internal environments are deployed with a virtual IP (VIP) mapped to an internal IP address. The internal endpoint is an Azure internal load balancer (ILB) and IP addresses are issued from the custom VNET’s list of private IP addresses.
An environment variable CONTAINER_APP_ENV_DNS_SUFFIX is used to automatically resolve the FQDN suffix for your environment.
As you create a custom VNET, keep in mind the following situations:
- If you want your container app to restrict all outside access, create an internal Container Apps environment.
- When you provide your own VNET, the network needs a single subnet.
- Network addresses are assigned from a subnet range you define as the environment is created.
- You can define the subnet range used by the Container Apps environment.
- Once the environment is created, the subnet range is immutable.
- A single load balancer and single Kubernetes service are associated with each container apps environment.
- Each revision is assigned to an IP address in the subnet.
- You can restrict inbound requests to the environment exclusively to the VNET by deploying the environment as internal.
As you begin to design the network around your container app, refer to Plan virtual networks for important concerns surrounding running virtual networks on Azure.
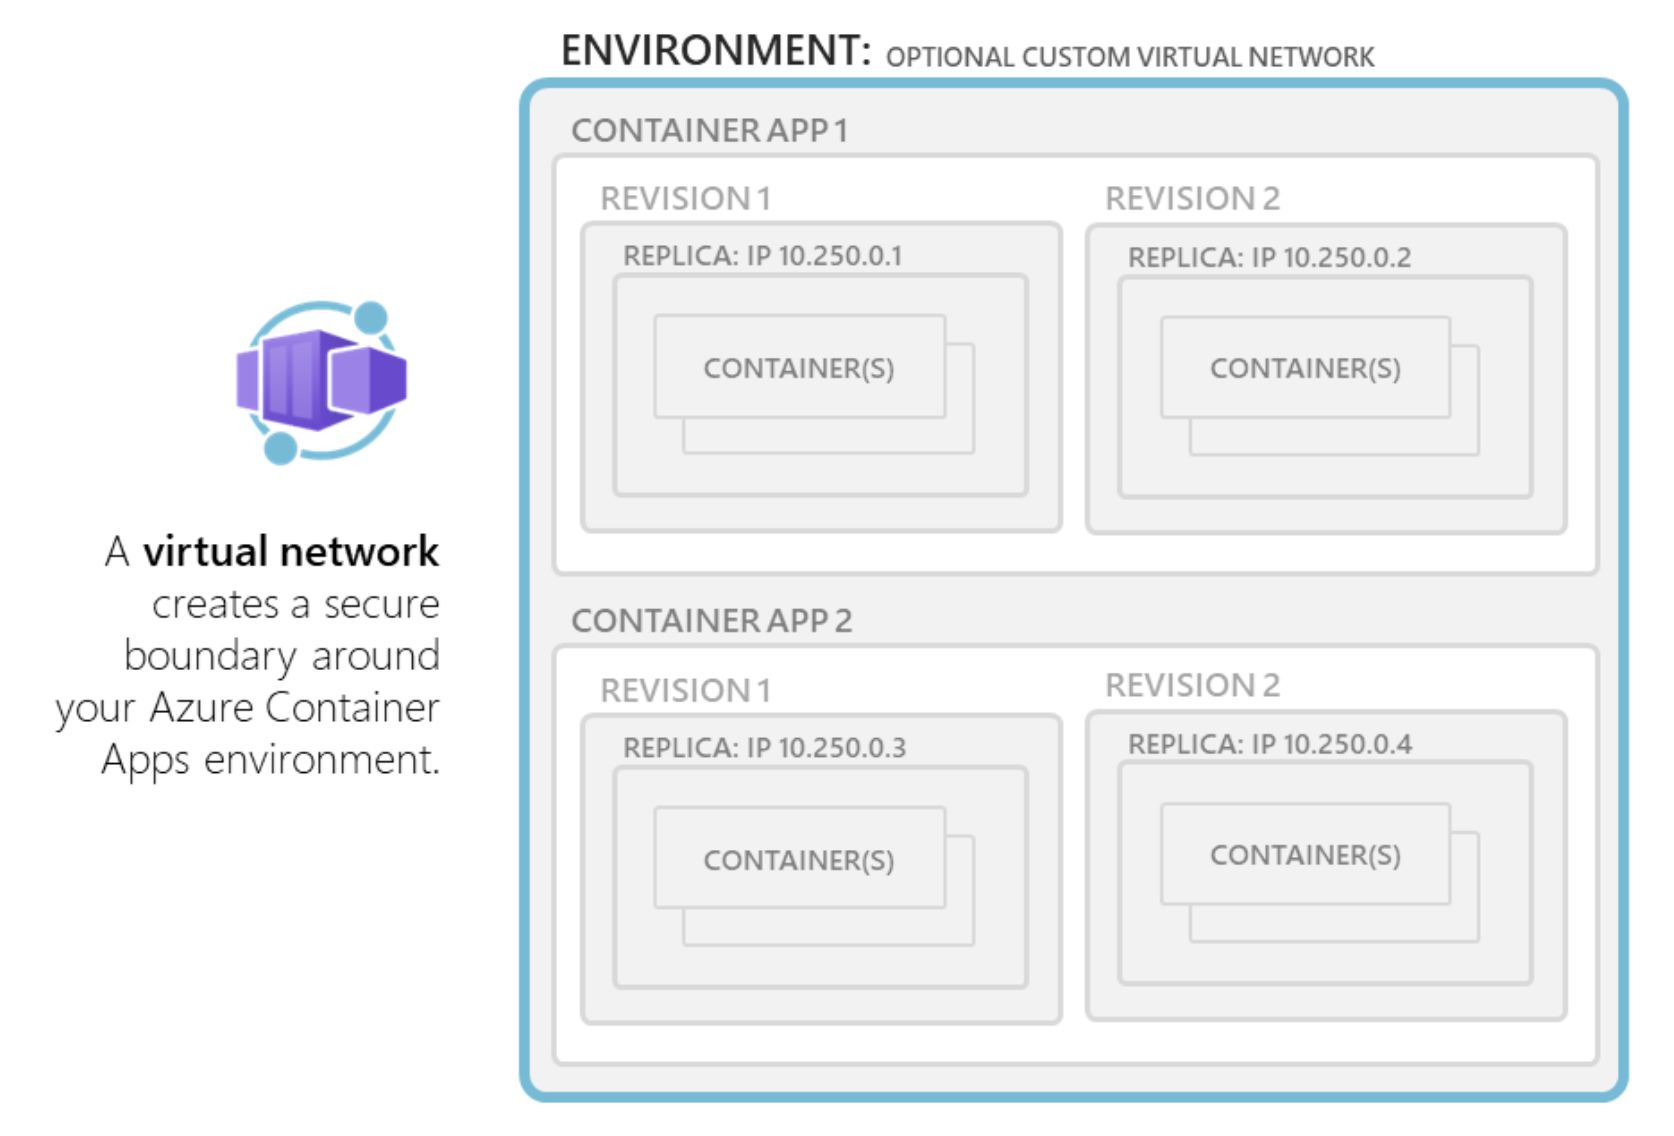
When you deploy an internal or an external environment into your own network, a new resource group prefixed with MC_ is created in the Azure subscription where your environment is hosted. This resource group contains infrastructure components managed by the Azure Container Apps platform, and shouldn’t be modified. The resource group contains Public IP addresses used specifically for outbound connectivity from your environment and a load balancer. As the load balancer is created in your subscription, there are extra costs associated with deploying the service to a custom virtual network.
HTTP edge proxy behaviour
Azure Container Apps uses Envoy proxy as an edge HTTP proxy. TLS is terminated on the edge and requests are routed based on their traffic split rules and routes traffic to the correct application.
HTTP applications scale based on the number of HTTP requests and connections. Envoy routes internal traffic inside clusters. Downstream connections support HTTP1.1 and HTTP2 and Envoy automatically detects and upgrades the connection should the client connection be upgraded. Upstream connection is defined by setting the transport property on the ingress object.
Private Application
To demonstrate the private communication of Azure Container Apps we will use a simple demonstrator composed of two container app environments communicating in private over your network architecture.

Backend service: The backend environment hosts the helloer application, a simple nodejs app that responds to HTTP requests. The environment is injected in a specific subnet and connected to a Log Analytics workspace in order to provide diagnostic settings and log centralization.
The application exposes an ingress through the environment ingress static IP. In order to reach your application ingress, the caller application have to use the ingress FQDN. Indeed, the Container Apps environment has a single public IP address for applications with external ingress visibility, and a single internal IP address for applications with internal ingress visibility.
Therefore, all applications within a Container Apps environment with external ingress visibility share a single public IP address. Similarly, all applications within a Container Apps environment with internal ingress visibility share a single internal IP address. HTTP traffic is routed to individual applications based on the FQDN in the host header. You can get access to the environment’s unique identifier by querying the environment settings.
Reaching the Internal LoadBalancer behind the ingress with the IP address will not work as the hostname is used to route the traffic to the correct application within the environment. We need to set up a private DNS zone with a wildcard (‘*’) A record pointing to the environment ingress static IP. The wildcard is justified by the fact that a given environment can have several applications, each with its own ingress, served from the same Internal Load Balancer.
Client service: The client environment hosts the greeter application, a python script that performs periodical HTTP GET requests to the backend. The environment is injected in a specific subnet and connected to the same Log Analytics workspace to provide diagnostic settings and log centralization.
This Greeter application does not provide any ingress, so there is no need to set up a DNS zone for this environment.
Start by forking the dedicated repository (zlatko-ms/az-capps-private) to have your copy on your GitHub account.
Once the repo has been forked, clone the repository on your local computer.
Browse the contents of the repository. The main.bicep is providing the definitions of the demonstrator and using specific modules to deploy the underlying infrastructure services (container app environements, container apps, DNS private zone, Log Analytics etc.) :
-
VNET Definition: The network infrastructure is defined by the two variables located in
main.bicep. If necessary update the ranges in order to fit your Azure environment constraints. The implementation of the VNet and underlying subnets is performed by the dedicatedvnet.bicepmodule. The network module outputs the identifiers of the created Vnet as well as of the subnets that will be required to wire up the VNet injection and the DNS zone. -
Container Apps Environments: The container apps environments are implemented in the
caenv.bicep. The VNet injection is set up by providing the adequate subnet id to the environment module as illustrated in themain.bicepfor the caenv-backend. A similar assignation is provided for the caenv-client environment atmain.bicep. The environment is attached to the Log Analytics workspace by setting up the Log Analytics Client Id and shared key. For sake of “technical clarity” we used the output of the law module to get the keys. In a production environment you should consider storing the secrets in a secured storage such an Azure Key Vault. -
Private DNS for Backend Service: In order to set up the DNS zone we’ll need the VNet Id, the environment domain as well as the environment static IP assigned on creation time. The domain name is provided by the backend service application environment as an output, assigned from
main.bicepand used in the dedicatedcaenvdns.bicepmodule. The static IP is used to set up thewildcar A recordin, assigned frommain.bicepand used incaenvdns.bicep. The VNet is provided as the output of thevnet.bicepmodule, assigned frommain.bicepand used in thecaenvdns.bicepmodule. -
Applications: The Container Apps are defined in
main.bicepand realized by the dedicatedca.bicepmodule. The helloer application ingress definition can be found inmain.bicepwhile the greeter has no ingress. The greeter application requires the URL to hit to be provided as aGREETER_URLenvironment variable. The value of the url is computed atmain.bicepand assigned atmain.bicep
Note that the subnet address ranges can’t overlap with the following reserved ranges:
- 169.254.0.0/16
- 172.30.0.0/16
- 172.31.0.0/16
- 192.0.2.0/24)
Deploying the new applications
To deploy the full environment, you need to execute the make command on the src/bicep repository.
To deploy the project with default values for the resource group name and region simply issue the following commands:
make
If you want to customize the location or the resource group name you can use the following:
make stackName=<my-resource-group-name> location=<my-azure-region>
Once deployed you’ll see 3 differents resource group. One containing your appication resources:
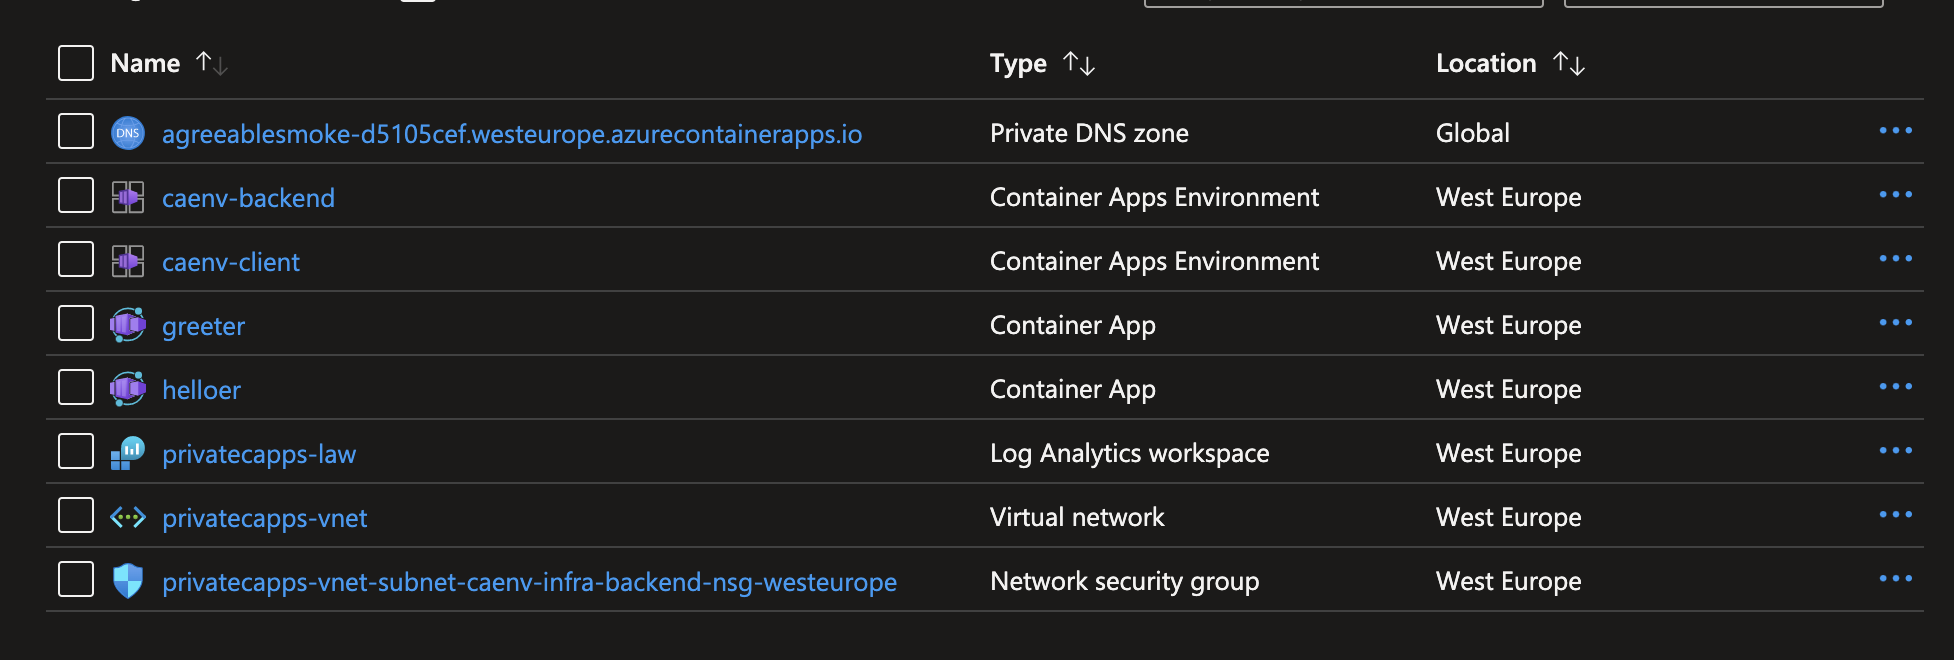
But also the two MC_ resource groups containing the infrastructure components managed by the Azure Container Apps platform and that shouldn’t be modified. As you can see those resource groups hosts the Kubernetes component that host the container app services.

Testing the application
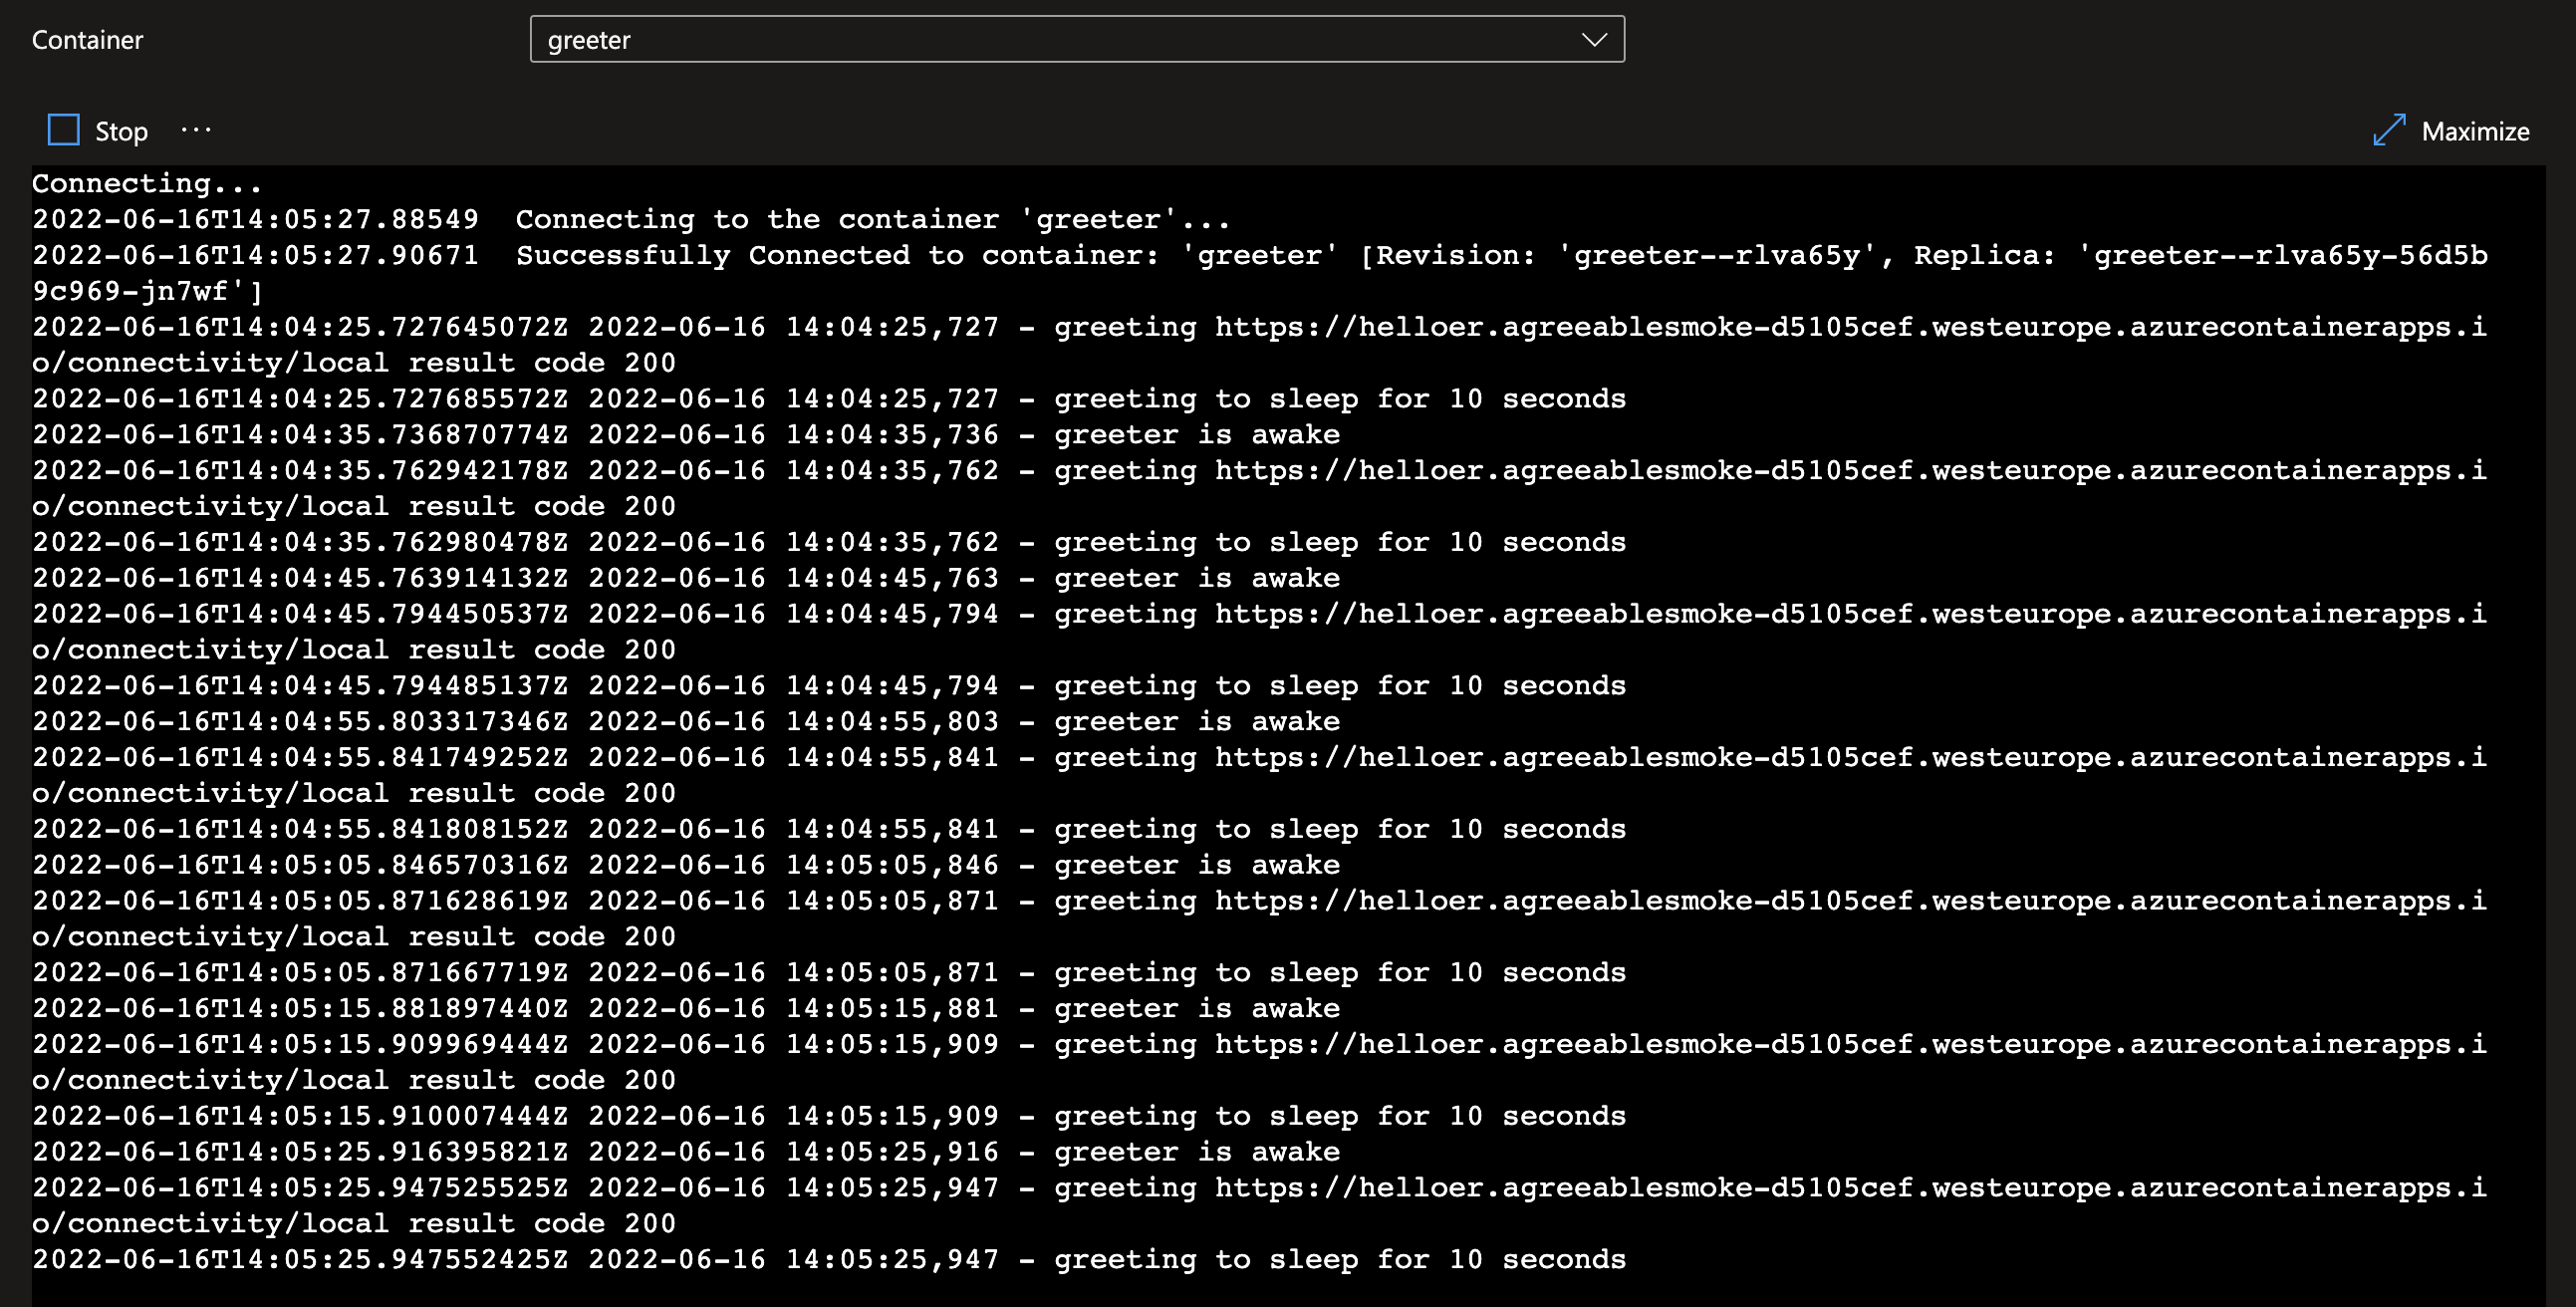
To validate that the two container apps are communicating together correctly, go to the log stream panel. On the greeter application you should see the application awaking every 10 second and calling the helloer application:
On the helloer log stream you’re seeing the incoming request from the greeter.
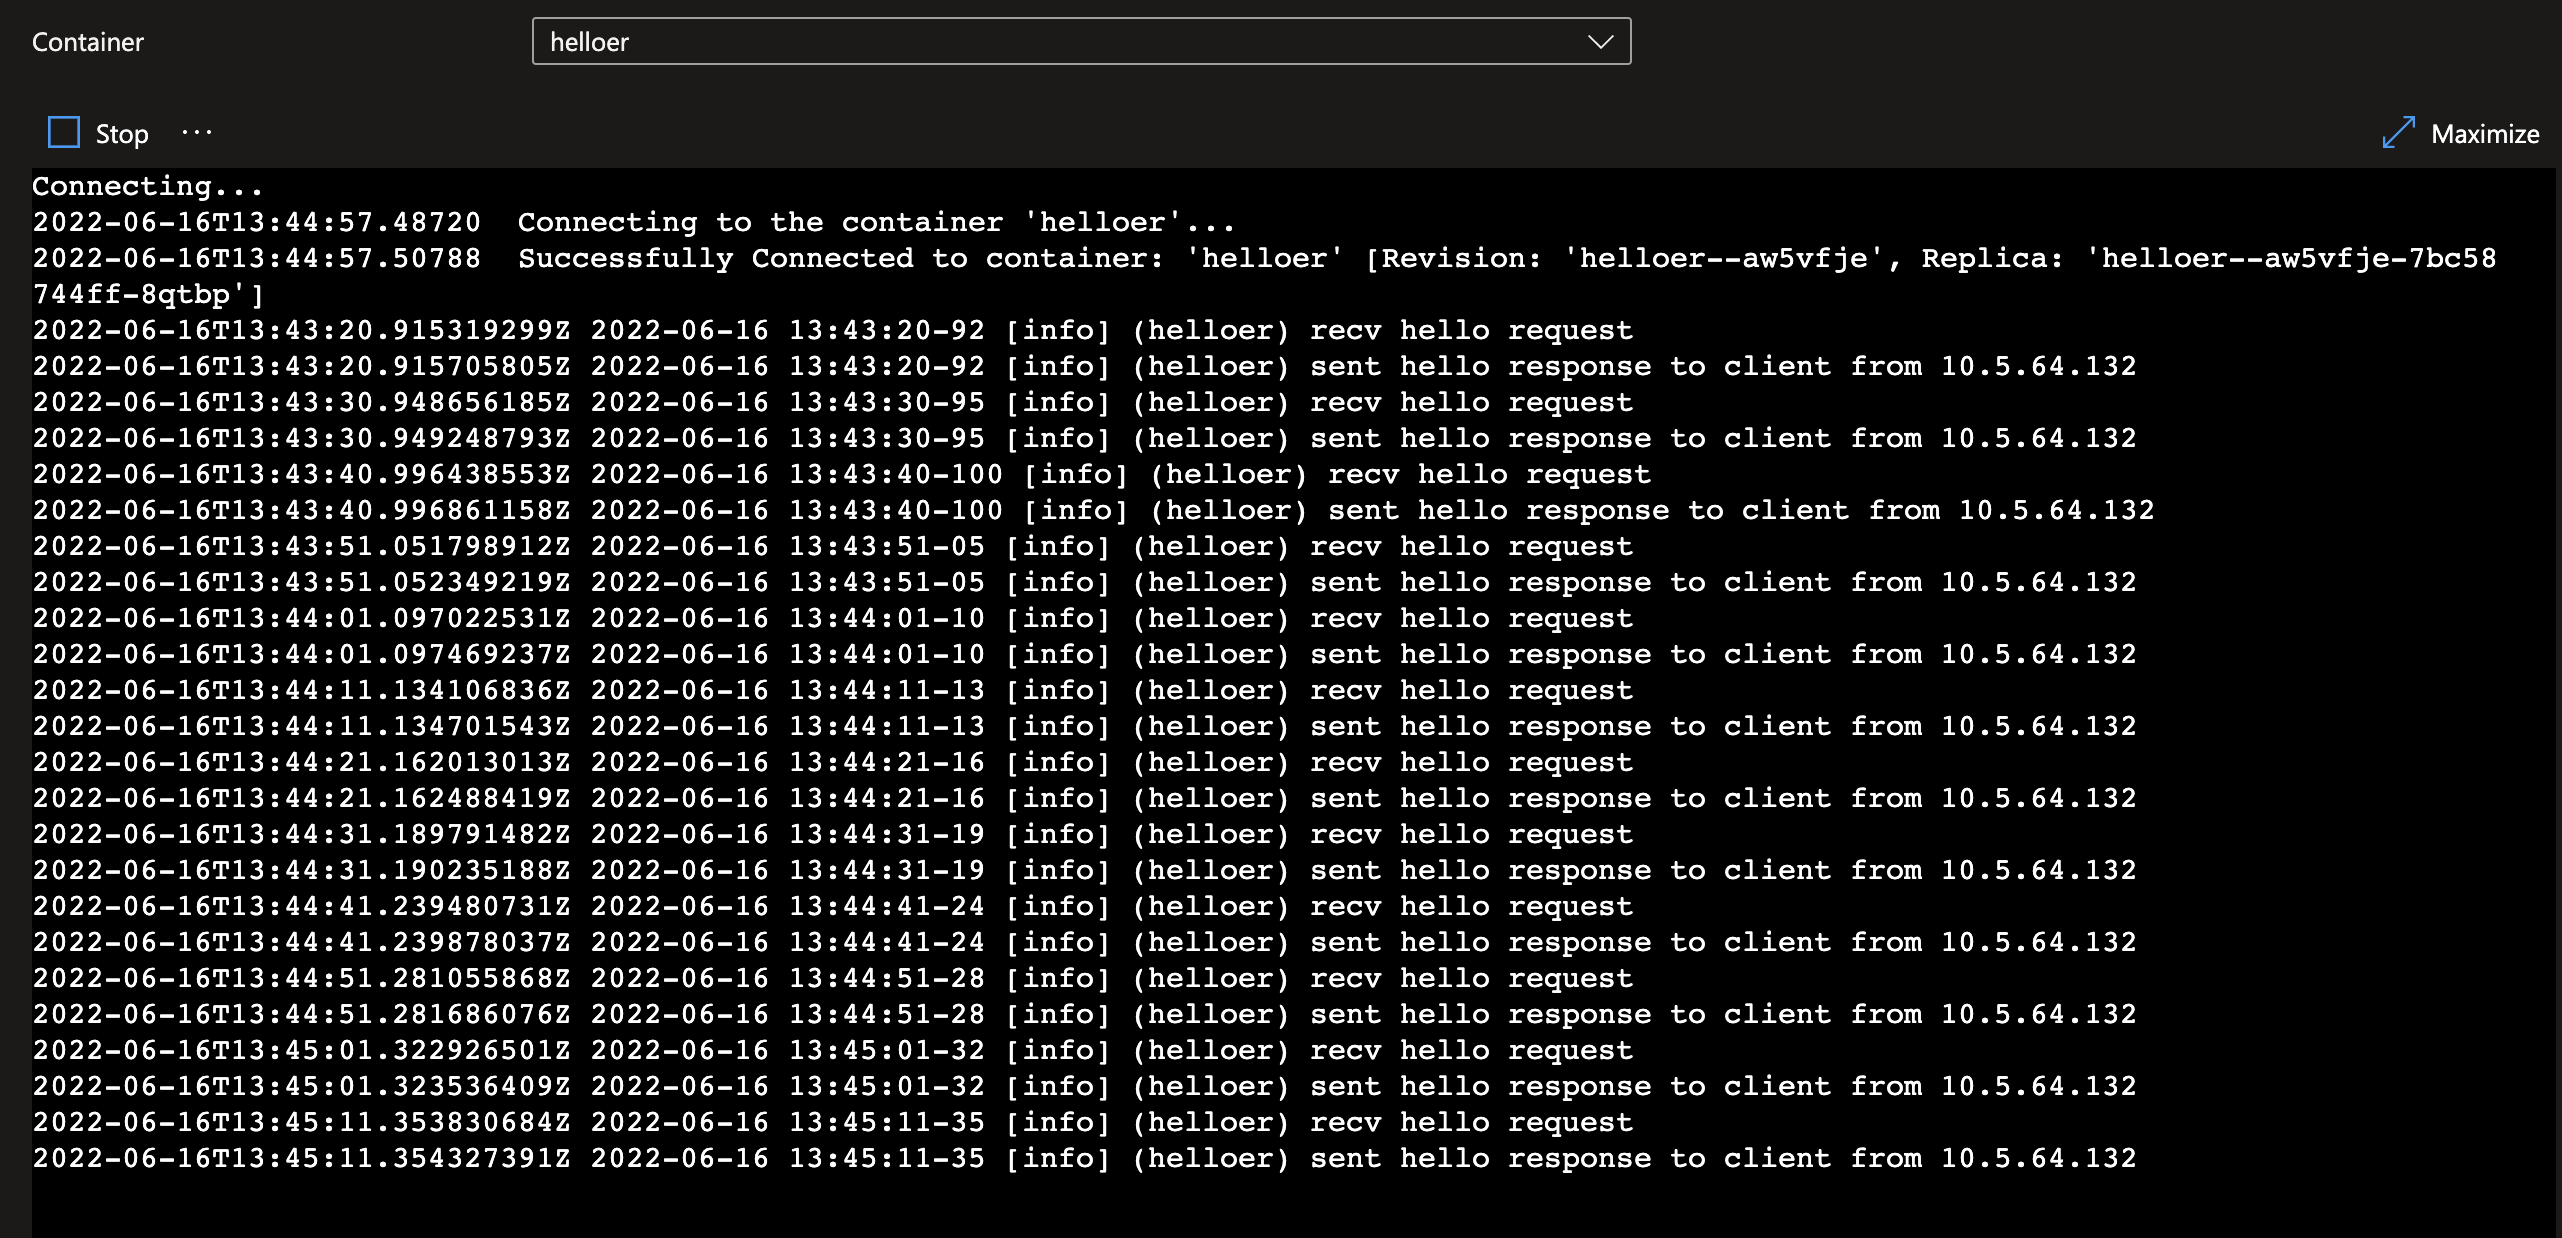
As you can see the trace is showing that the helloer is receiving a greeting rcv hello request and is answering to the client over its private IP sent response to client from 10.5.64.132. It indicates the request is addressed from a client with IP 10.5.64.132, i.e. the request origins from the subnet-caenv-infra-client (10.5.64.0/20) where the caenv-client has been injected.
Lab 4 - Play with storage
Context
To persist data or just to use it temporarly, storage is often use with containerized applications. This lab will guide you to implement storage for your Azure Container Apps.
Storage
A container app has access to different types of storage. A single app can take advantage of more than one type of storage if necessary.
| Storage type | Description | Usage examples |
|---|---|---|
| Container file system | Temporary storage scoped to the local container | Writing a local app cache. |
| Temporary storage | Temporary storage scoped to an individual replica | Sharing files between containers in a replica. For instance, the main app container can write log files that are processed by a sidecar container. |
| Azure Files | Permanent storage | Writing files to a file share to make data accessible by other systems. |

Container file system
A container can write to its own file system.
Container file system storage has the following characteristics:
- The storage is temporary and disappears when the container is shut down or restarted.
- Files written to this storage are only visible to processes running in the current container.
- There are no capacity guarantees. The available storage depends on the amount of disk space available in the container.
Temporary storage
You can mount an ephemeral volume that is equivalent to emptyDir in Kubernetes. Temporary storage is scoped to a single replica.
Temporary storage has the following characteristics:
- Files are persisted for the lifetime of the replica.
- If a container in a replica restarts, the files in the volume remain.
- Any containers in the replica can mount the same volume.
- A container can mount multiple temporary volumes.
- There are no capacity guarantees. The available storage depends on the amount of disk space available in the replica.
To configure temporary storage, first define an EmptyDir volume in the revision. Then define a volume mount in one or more containers in the revision.
Configuration
When using temporary storage, you must use the Azure CLI with a YAML definition to create or update your container app. For example, you can use the sample hello-world which is deployed by default when creating a container environment (mcr.microsoft.com/azuredocs/containerapps-helloworld:latest).
To update an existing container app to use temporary storage, export your app’s specification to a YAML file. You can use the command az containerapp show and the output parameter to extract a YAML definition.
az containerapp show -n <APP_NAME> -g <RESOURCE_GROUP_NAME> -o yaml > my-app.yaml
Make the following changes to your container app specification. It uses the same format than volumes for kubernetes
- Add a
volumesarray to thetemplatesection of your container app definition and define a volume. - The
nameis an identifier for the volume. For instance, name it “myempty” - Use
EmptyDiras thestorageType. - For each container in the template that you want to mount temporary storage, add a
volumeMountsarray to the container definition and define a volume mount. - The
volumeNameis the name defined in thevolumesarray. - The
mountPathis the path in the container to mount the volume.
properties:
    managedEnvironmentId: /subscriptions/<SUBSCRIPTION_ID>/resourceGroups/<RESOURCE_GROUP_NAME>/providers/Microsoft.App/managedEnvironments/<ENVIRONMENT_NAME>
    configuration:
    activeRevisionsMode: Single
    template:
      containers:
      - image: mcr.microsoft.com/azuredocs/containerapps-helloworld:latest
        name: my-container
        volumeMounts:
        - mountPath: /myempty
          volumeName: myempty
      volumes:
      - name: myempty
        storageType: EmptyDir
Warning: Make sure you don’t have duplicate
volumesdefinition when you update youryamlfile or you may have error that volume mount does not exist.
Once your new Yaml file is ready, update your container app using the YAML file.
az containerapp update --name <APP_NAME> --resource-group <RESOURCE_GROUP_NAME> --yaml my-app.yaml
Connect to your container and check that a volume has been created. You can use the az container exec command to do so.
az containerapp exec --name <APP_NAME> --resource-group <RESOURCE_GROUP_NAME>

This example was fine for temporary usage but what if we want to persist our files ? Let’s see how you can leverage Azure Files.
Azure Files
A good way to persist files is to use a storage PaaS service. With Azure Container Apps, you can mount a file share from Azure Files as a volume inside a container.
Azure Files storage has the following characteristics:
- Files written under the mount location are persisted to the file share.
- Files in the share are available via the mount location.
- Multiple containers can mount the same file share, including ones that are in another replica, revision, or container app.
- All containers that mount the share can access files written by any other container or method.
- More than one Azure Files volume can be mounted in a single container.
To enable Azure Files storage in your container, you need to set up your container in the following ways:
- Create a storage definition of type
AzureFilein the Container Apps environment. It is like astorageclassif you know kubernetes already. - Define a storage volume in a revision.
- Define a volume mount in one or more containers in the revision.
Configuration
When using Azure Files, you must use the Azure CLI with a YAML definition to create or update your container app.
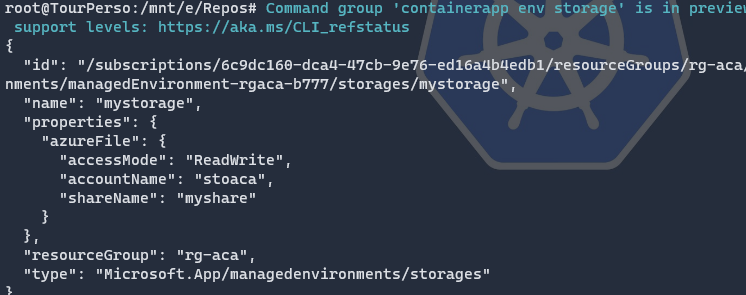
Start by creating a storage account and retrieve its access keys. Then, add a storage definition of type AzureFile to your Container Apps environment. You must use the command az containerapp env storage.
Notice: you need to use the name of the container app environment, not the container app itself !
az containerapp env storage set --name <ACA_ENV> --resource-group <ENV_RESOURCE_GROUP> \
    --storage-name mystorage \
    --azure-file-account-name <STORAGE_ACCOUNT_NAME> \
    --azure-file-account-key <STORAGE_ACCOUNT_KEY> \
    --azure-file-share-name <STORAGE_SHARE_NAME> \
    --access-mode ReadWrite
Replace <STORAGE_ACCOUNT_NAME> and <STORAGE_ACCOUNT_KEY> with the name and key of your storage account. Replace <STORAGE_SHARE_NAME> with the name of the file share in the storage account.
Valid values for --access-mode are ReadWrite and ReadOnly.
If the command is successful, you should see something like this:
Like in previous part, export the YAML configuration of your app using the az containerapp show command.
az containerapp show -n <APP_NAME> -g <RESOURCE_GROUP_NAME> -o yaml > my-app.yaml
Make the following changes to your container app specification.
- Add a
volumesarray to thetemplatesection of your container app definition and define a volume. - The
nameis an identifier for the volume. - For
storageType, useAzureFile. - For
storageName, use the name of the storage you defined in the environment. - For each container in the template that you want to mount Azure Files storage, add a
volumeMountsarray to the container definition and define a volume mount. - The
volumeNameis the name defined in thevolumesarray. - The
mountPathis the path in the container to mount the volume.
properties:
    managedEnvironmentId: /subscriptions/<SUBSCRIPTION_ID>/resourceGroups/<RESOURCE_GROUP_NAME>/providers/Microsoft.App/managedEnvironments/<ENVIRONMENT_NAME>
    configuration:
    template:
      containers:
      - image: <IMAGE_NAME>
        name: my-container
        volumeMounts:
        - mountPath: /my-files
          volumeName: azure-files-volume
      volumes:
      - name: azure-files-volume
        storageType: AzureFile
        storageName: mystorage
Update your container app using the YAML file.
az containerapp update --name <APP_NAME> --resource-group <RESOURCE_GROUP_NAME> --yaml my-app.yaml
Once the command is applied, your container is restarted and a volume is mapped to it. Connect to your container (with the exec command), browse the file system and create a file on the volume.
If you did a wrong volume configuration you won’t be able to access to your container app using the exec command.
az containerapp exec --name <APP_NAME> --resource-group <RESOURCE_GROUP_NAME>
Once connected:
cd /
cd /my-files
touch myfile.txt
Check directly in the Azure Portal that your file is indeed persisted in the Azure Files instance.
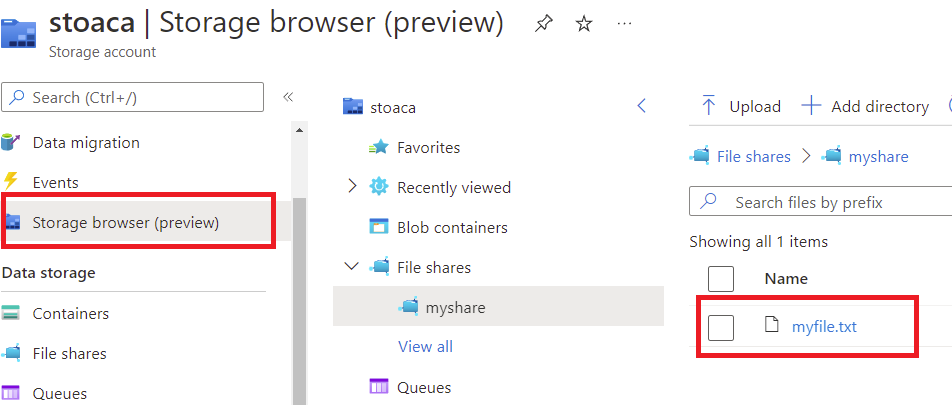
That’s it. How simple is it to provide persistent storage to your containerized application !
Note that different type of storage give different performance results. Generally, Azure File Share is faster exept for large bunch of small files. If you are interested, read the great article of Andre Dewes.
Cleaning
Delete resources
Delete resources
Now that the workshop is finished, it is important to delete unused resources to stop the billing. Open the Azure portal and delete the resource groups. All contained resources will be removed.
Contributors
The following people have contributed to this workshop, thanks!
- Zlatko ARIFHODZIC (Microsoft)
- Louis-Guillaume MORAND (Microsoft)
- Maxime VILLEGER (Microsoft)
- Fethi DILMI (Microsoft)
The workshop relies on the great work done by others:
- https://github.com/azure/reddog-code/
- https://github.com/azure/reddog-containerapps
- https://github.com/zlatko-ms/az-capps-private
But of course, let’s not forget the Product Group who works hard to improve Azure Container Apps day after day.
